Novidades da próxima release Gestix 5.1.03

A nova release do software Gestix, a versão 5.1.03, apresenta várias funcionalidades novas e melhoramentos em dezenas de outras. Estas melhorias enriquecem ainda mais as novas edições Gestix 2014, ficando de imediato disponíveis consoante o produto. As edições mais antigas também beneficiam da correção de problemas e de vários melhoramentos nesta versão.

Resumo

GTM-2622
Pesquisa de documentos no dashboard por série e número, referência, etc
GTM-2624
Verificação de Consistência mais rápida
GTM-2620
Improved signed documents checker function
GTM-2614
Faster operation through optimized user session management
GTM-2547
Permitir escolha do layout em encomendas de fornecedor
GTM-2542
Seleção hierárquica das rubricas orçamentais em faturação e compras
GTM-2568
Em impressão em lote para além de ser possivel imprimir varios documentos de uma so vez é possivel imprimir o Original, Duplicado ou Triplicado em separado.
GTM-2621
Rastreio de produtos: os números de série em RMA apareciam disponíveis em novas vendas
GTM-2597
Quando houver recibo sem documento associado ao testar o saft da um aviso informando este caso Ex:
2. Payments [RCB 5] Related Document not available in text line with amount 4. Payments [RCB 5] Total amount must be positive
GTM-2596
Novos logótipos Gestix
GTM-2580
Orçamentos editáveis, mesmo após impressão
GTM-2573
Relatório de Situação de Projeto corrigido quanto ao tratamento de guias e folhas de obra
GTM-2571
Faturação mensal de contratos em dia específico do mês


A libertação da versão Gestix 5.1.03 está planeada para 5 de Agosto de 2014.

Product traceability by Batch Number or by Serial Number

Serial Numbers are used for individual product. Batch numbers are used for lots of a product sharing some properties like production and “best before” date.

b Enterprise enables you to choose which products to handle Batch/Lot numbers and which products to handle serial numbers like smartphones, computers, and automobile parts.

Avoid losses due to produce validity and warranties issues, while meeting common standards and best practices in produce traceability.

Gestix offers two methods for tracking products:

Serial Number Tracking

Each unit in stock is assigned a unique id along with other information related to that particular unit or piece (see here an example of application in aircraft parts trading).

Batch Number Tracking

A unique id file is assigned to a particular quantity of product, along with other information relating to that batch of product, including product date and expiration date.

To enable one of the methods, edit the Product Traceability field in the article record, and choose Batch Number.

batch-number-tracking-in-gestix

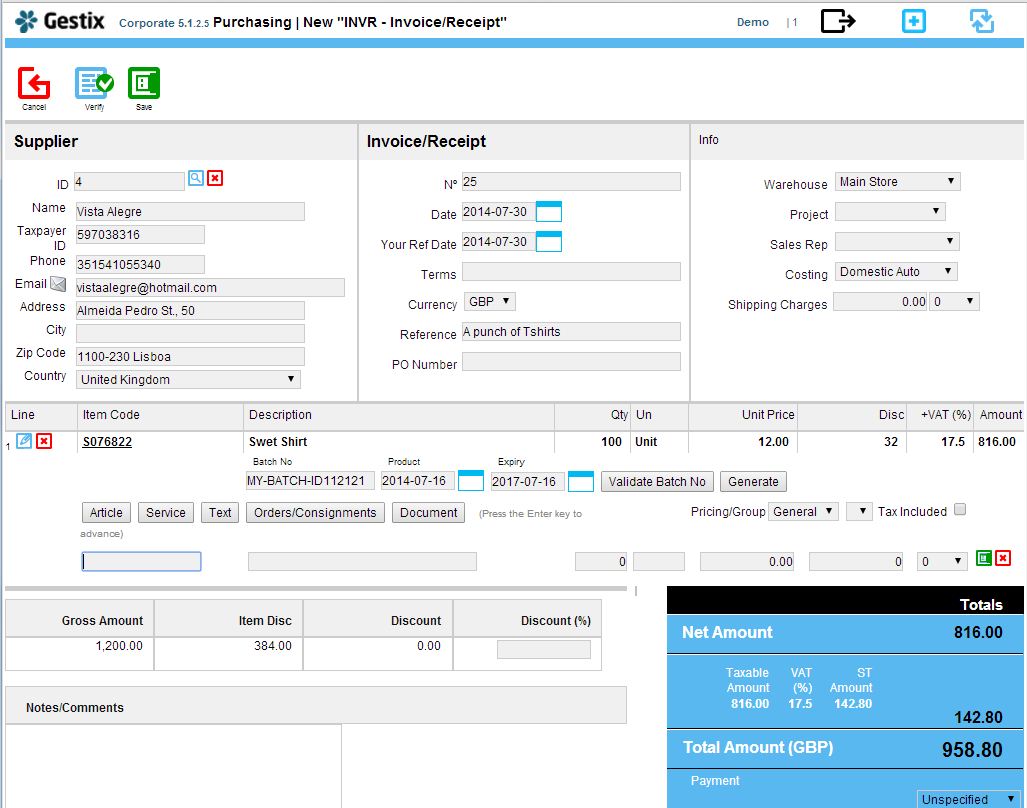
Enter purchases, manufacture orders, and stock receipts with batch numbers being assigned by the operator or generated by the application.

entering2-batch-of-purchased-products-in-gestix

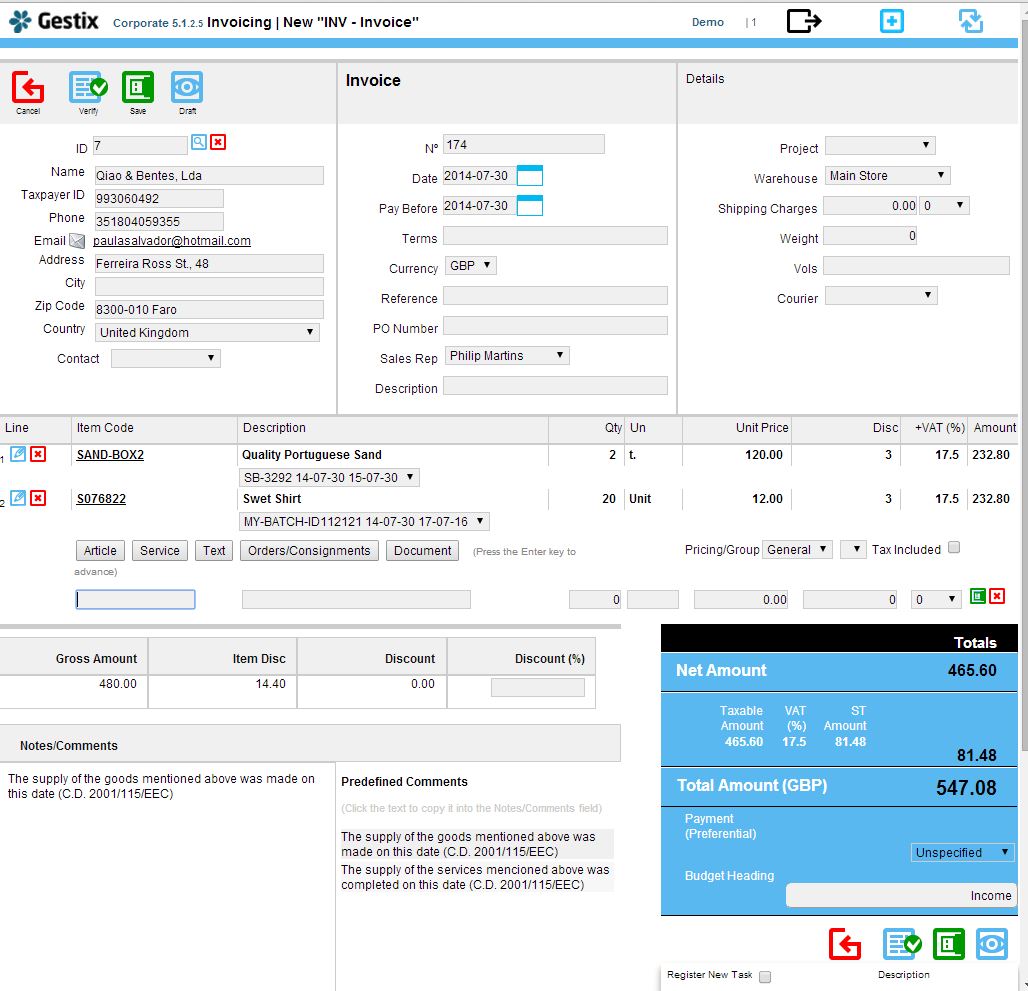
On sales, identify the batch of each tracked product by selecting it from the drop list.

invoice-with-serial-numbers-in-gestix

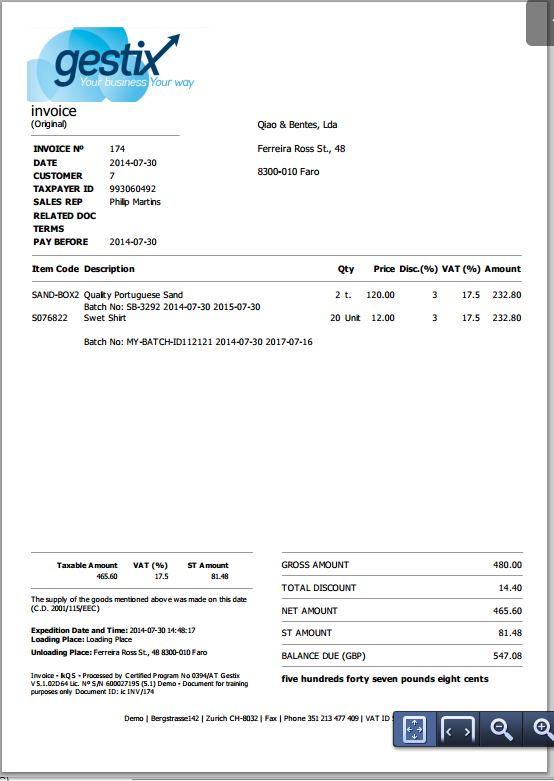
The final bill shows the relevant information for each item including batch id and dates.

sales-with-batch-numbers


Comunicação de Guia de Remessa ou Transporte por Webservice

Guia de Transporte – comunicar instantaneamente uma guia à AT por Webservice

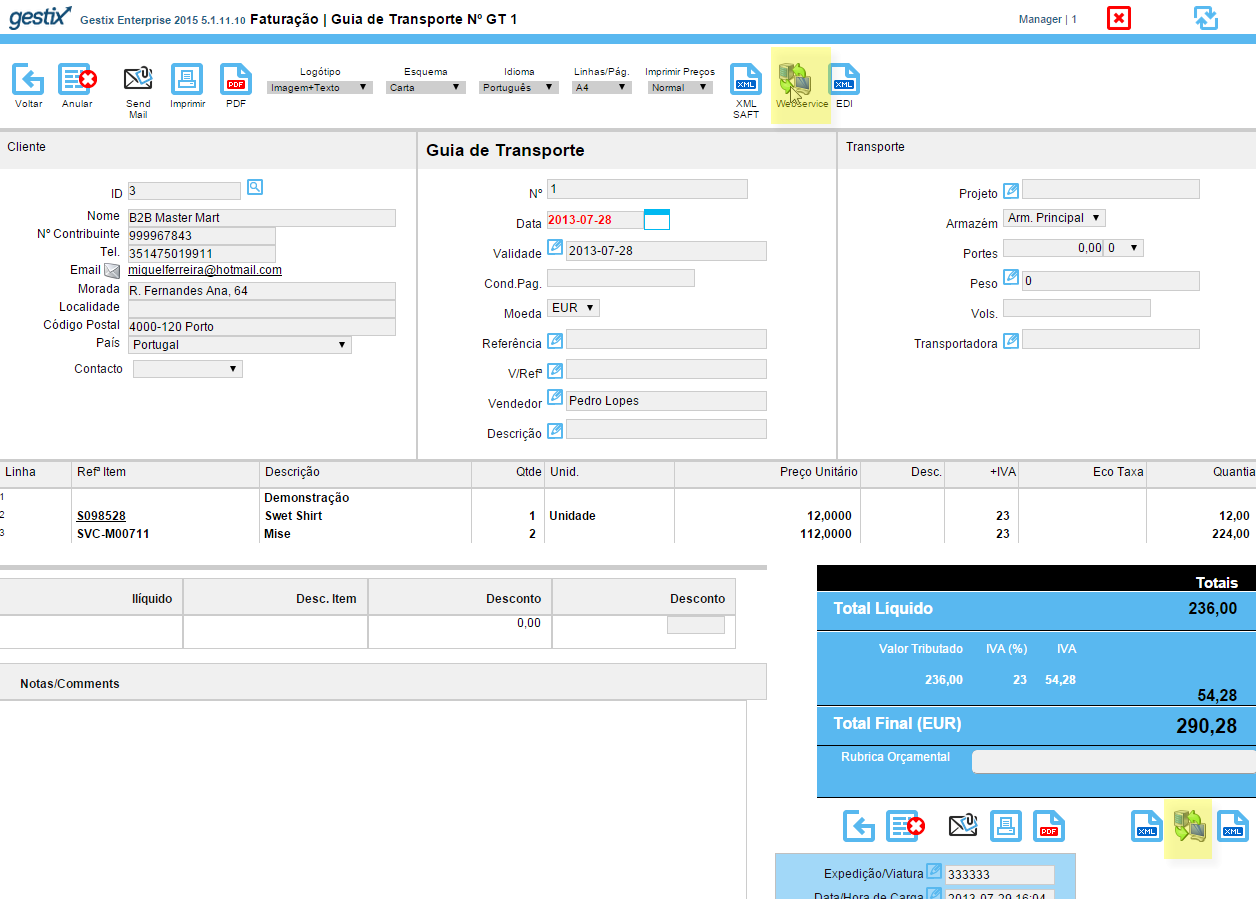
O Gestix ERP oferece a possibilidade de comunicar os documentos de transporte por Webservice. Ao fazer um documento válido para transporte (Guia de Remessa, ou Guia de Transporte) fica disponível o botão Webservice na barra de ferramentas do documento.

Validação de Guia de Transporte por Webservice

Para o documento poder ser comunicado à AT deve  dispor de informação de Viatura e Data/Hora de Carga.

Se ainda não definiu o Utilizador e Password no site das Finanças e colocou estes dados na configuração do Gestix (menu Admin / Credenciais AT) veja nos passos seguintes como proceder a essa configuração inicial.

Criar utilizador no site da autoridade tributaria e configuração no Gestix

Aceda ao site da AT em https://www.portaldasfinancas.gov.pt/pt/home.action;
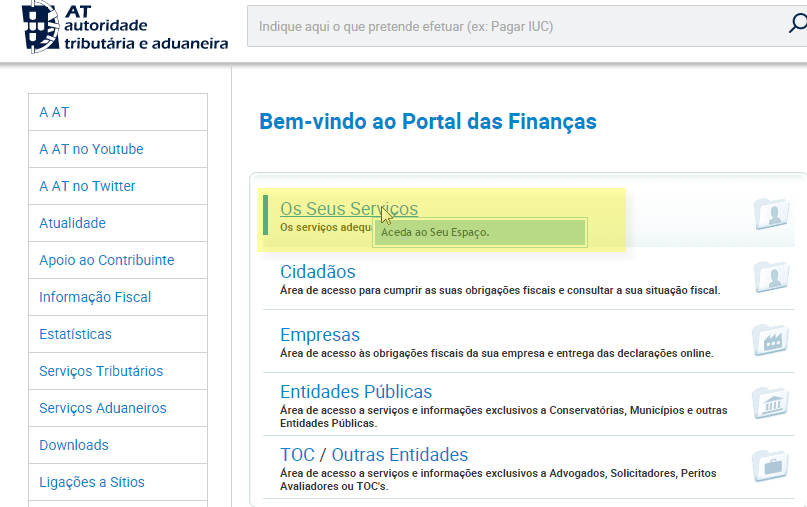
Faça login com os seus dados habituais e depois no painel centrar escolha a opção “Os seus Serviços

documentos_utilizador_AT_1

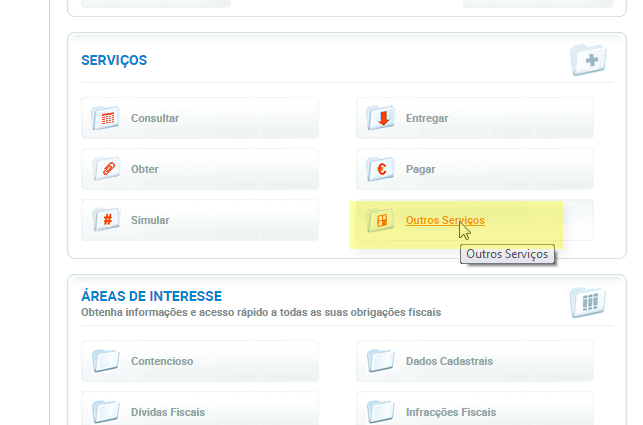
Na lista de opções que aparecem, escolha a opção “Outros Serviços”

documentos_utilizador_AT_2

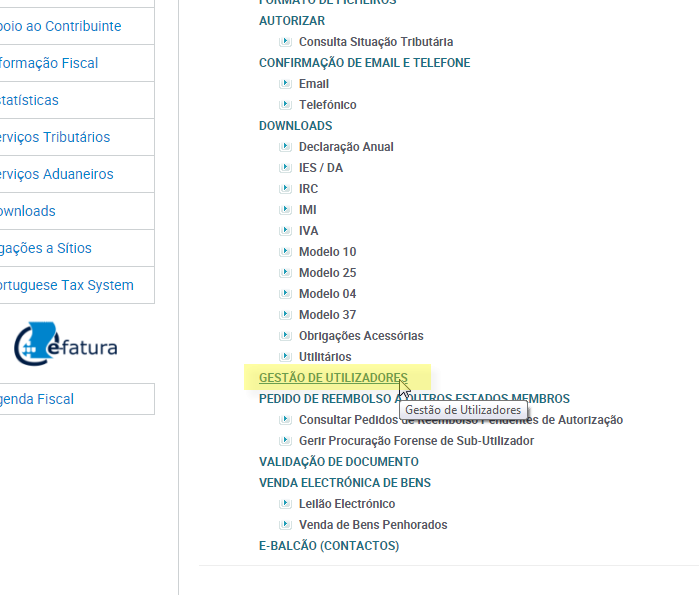
Na lista de opções, escolha a opção “Gestão de Utilizadores”

documentos_utilizador_AT_3

Irá parar a uma listagem de utilizadores com autorização para aceder aos serviços da AT. Se ainda não tiver nenhum utilizador, escolha a opção “Criar um novo Utilizador”

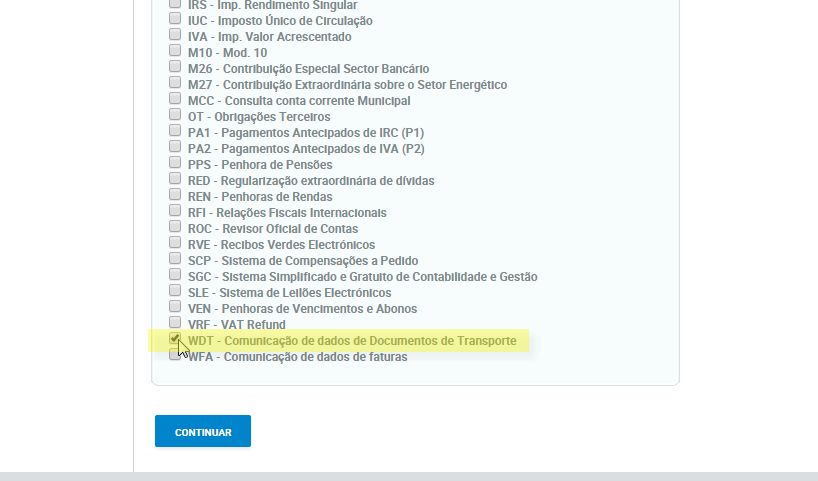
Para documentos de Transporte, deve ativar a opção “WDT – Comunicação de dados de Documentos de Transporte”;

documentos_utilizador_AT_4

Guardar a informação sobre o número de utilizador, bem como a palavra passe que escolheu e inserir estes dados no seu Gestix em Admin | Credenciais AT.

inserir_user_ AT_gestix

Uma vez completada esta configuração, o seu Gestix fica pronto para comunicar instantaneamente os documentos de transporte à AT.

Comunicação Automática de Documentos de Transporte por Webservice

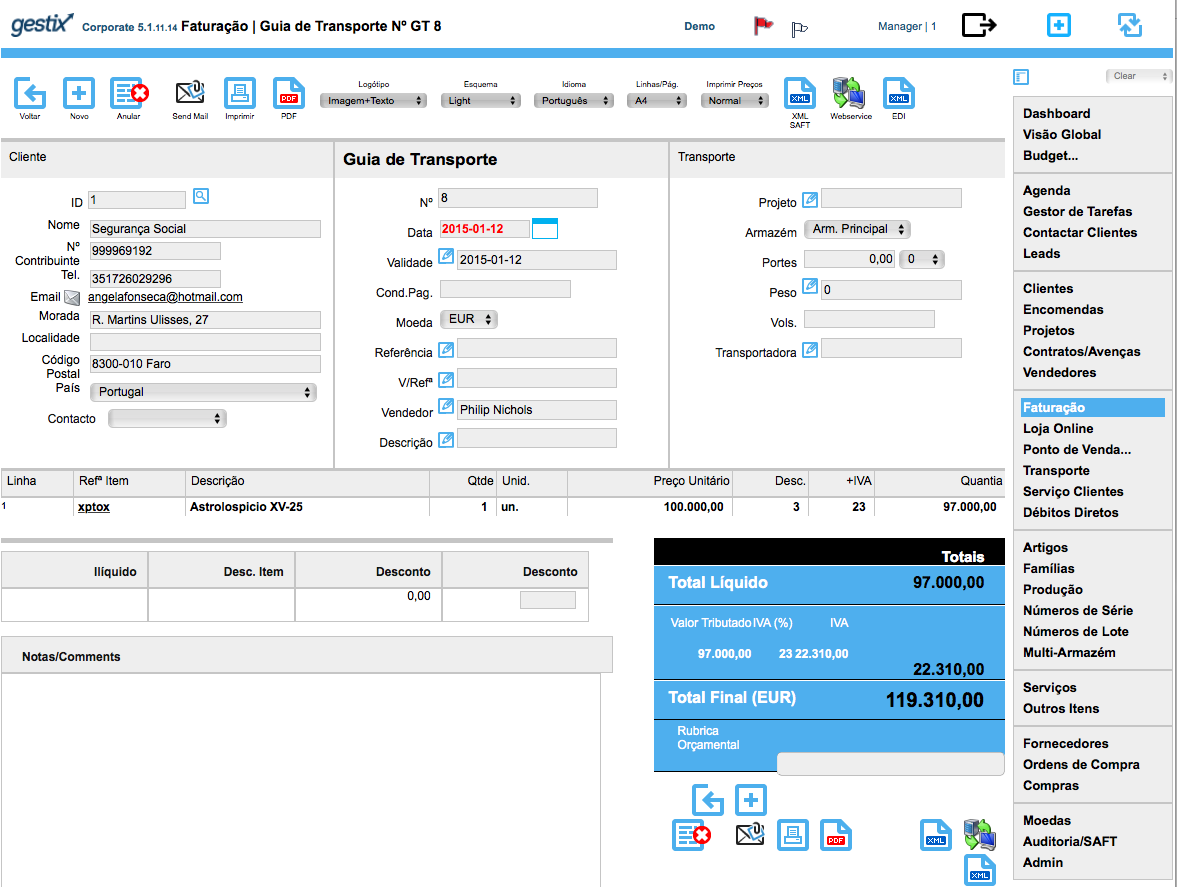
Ao concluir uma Guia de Remessa ou Guia de Transporte,  ao lado do botão Imprimir e PDF encontra o botão Webservice.

Clip2

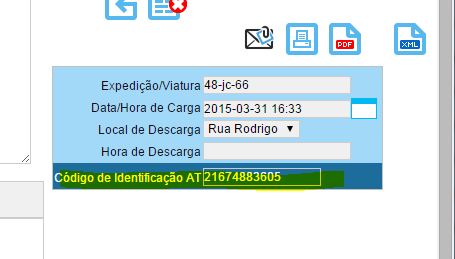
Basta clicar neste botão para a guia ser comunicada e atualizada com o respetivo Código AT para efeitos de transporte.

codigo

Funcionalidade disponível em edições Gestix Business 2014 e posteriores.

Para mais informações visite gestix.com ou contacte-nos pelo telefone +351 919 844 655

Installing Gestix on a brand new Ubuntu LTS 14.04 (Trusty Tahr)

This article covers the installation of Gestix on a new server, Ubuntu LTS 14.04 in this case, without any software installed on it but the core operating system.

First we install the prerequisites, MySQL, Apache2, and Htmldoc. Gestix does not require PHP to be installed, yet PHP, as well as other languages, can be used to interact with the Gestix Corporate edition, to implement custom reports, collaboration portals, etc. In this example PHP is not required at all.

Let’s do it.

sudo apt-get install mysql-server
sudo apt-get install apache2

Add some modules to Apache, but not too many. Enable mod_cgi to permit the execution of the gestix binaries instead of downloading them. The Apache module mod_env is also enabled here, in order to support setting environment variables from the Apache options or configuration files.

Apache recommends using a2enmod to enable Apache modules by name, so we do:

sudo a2enmod cgi
sudo a2enmod env

Then, htmldoc, a open source solution for rendering the PDFs in Gestix.

sudo apt-get install htmldoc

In order for htmldoc to work properly with Gestix, some environment variables need to be set. We’ll do it using the Apache’s options:

SetEnv TMPDIR /tmp
SetEnv PATH_INFO /usr/share/htmldoc
SetEnv HTMLDOC_NOCGI 1

Install some stuff needed by Gestix

sudo apt-get install libssl0.9.8

sudo get-get install libmysqlclient.so.16.0.0

Finally, we install the Gestix tar ball  (file type tar.gz). Using the tar ball instead of the Debian package allows to install Gestix on the default web, by extracting in the selected spot. In this case, we’ll create a subnet http://localhost/gestix so we create this gestix folder in the web folder, and get the contents of the package copied there. It will create the gnet folder with all gestix’s stuff in there.

cd /var/www/html

sudo mkdir ./gestix

cd ./gestix

sudo tar xf ~/my_downloads/gestix_erp_web_amd64.tar.gz

sudo sh ./gnet/install.sh mysql_user mysql_pw database_name

It should be ready now. Open Gestix from the browser (replace 10.0.0.11 by your server’s IP):

http://10.0.0.11/gestix/gnet/cgi-bin/gestix.cgi

Is it working fine? Good. Otherwise, please post/comment about it here. We’ll help of course.

Protect your Gestix with daily database backups

In production servers it’s advisable to install AutoMySQLBackup:

apt-get install automysqlbackup

To backup all databases invoke automysqlbackup from the command line or add it through crontab -e:

# Edit this file to introduce tasks to be run by cron.
#
# Each task to run has to be defined through a single line
# indicating with different fields when the task will be run
# and what command to run for the task
#
# To define the time you can provide concrete values for
# minute (m), hour (h), day of month (dom), month (mon),
# and day of week (dow) or use '*' in these fields (for 'any').#
# Notice that tasks will be started based on the cron's system
# daemon's notion of time and timezones.
#
# Output of the crontab jobs (including errors) is sent through
# email to the user the crontab file belongs to (unless redirected).
#
# For example, you can run a backup of all your user accounts
# at 5 a.m every week with:
# 0 5 * * 1 tar -zcf /var/backups/home.tgz /home/
#
# For more information see the manual pages of crontab(5) and cron(8)
#
# m h dom mon dow command

55 3 * * * automysqlbackup /home/company/mysql_backup/

More about Gestix at Gestix.com.
Como fazer Factura de Oferta de Mercadorias

Como fazer um documento de oferta de uma dada mercadoria para venda, ou, como fazer um fatura com o valor de 0 (zero) euros, é uma pergunta frequente, desde que foram introduzidas as novas normas para o software de facturação em Portugal.

Problema: fazer fatura com valor total nulo (zero)

Sobre  a possibilidade de fazer uma fatura com valor zero, em geral esta opção não é permitida pelas normas fiscais, já que uma factura, por definição, é a transmissão de determinados bens em troca por um dado valor pecuniário. Se esse valor pecuniário é nulo, não faz sentido faturar. A lei portuguesa em concreto não permite praticar esta opção: No caso de o software registar faturas com total a pagar nulo, o ficheiro SAF-T, de comunicação obrigatória ao Portal das Finanças (portaldasfinancas.gov.pt) será rejeitado pelo sistema estatal com a indicação da linha onde o documento estiver mencionado.

Solução: designar documento específico para Ofertas

Sendo assim, é necessário designar um documento especialmente para o efeito. O documento deverá registar a saída de armazém dos bens e disponibilizar a respetiva informação na ficha do cliente. Estes itens serão reportados no SAF-T, na secção Movimentos de Mercadorias, onde não há obstáculo ao registo de transações sem preço.

Menu: Admin | Documentos de Clientes/Projetos, tipologia de base a escolher: Guia de Trabalhos em Curso.

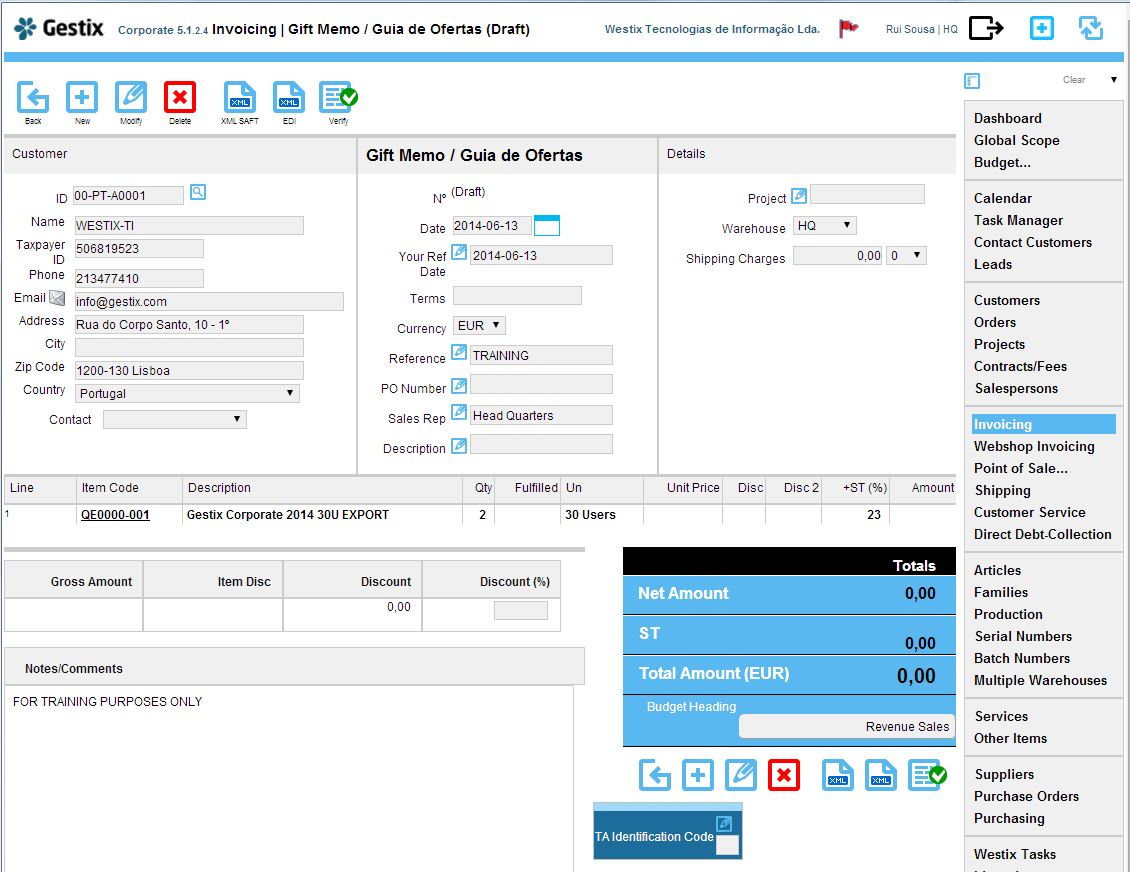
A figura seguinte mostra o documento em fase de esboço:

Draft of a Gift Memo / Guia de Ofertas
Gift Memo / Guia de Ofertas

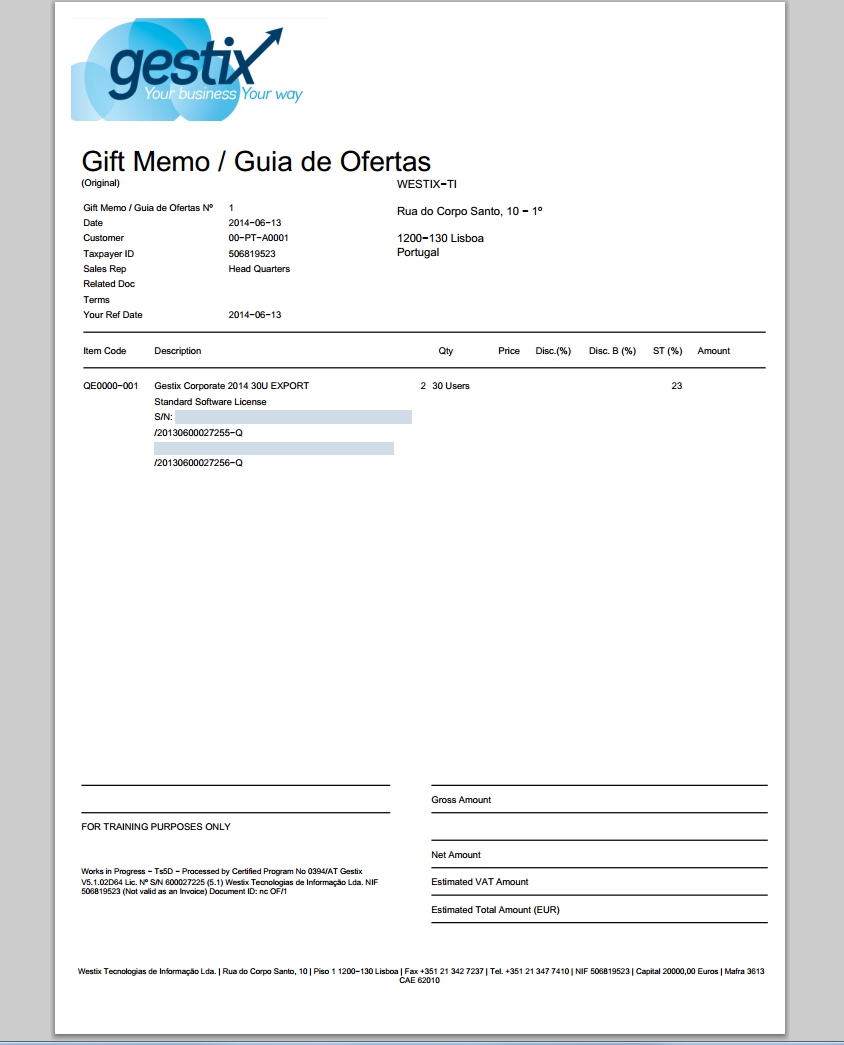
E finalmente o documento no formato de impressão escolhido pelo operador:

Imprimindo Gift Memo / Guia de Ofertas

Disponível no produto Gestix Enterprise 2014

Links

http://gestix.pt/pt/solucoes/corporate

http://www.gestix.com

Resetting the stock of all warehouses

When maintaining a large base of articles during several years, it may be convenient to tell the system to ignore past moves relative to a user-specified date.

This procedure will modify the stock readings in article records and inventory reports without removing or modifying any records in the database.

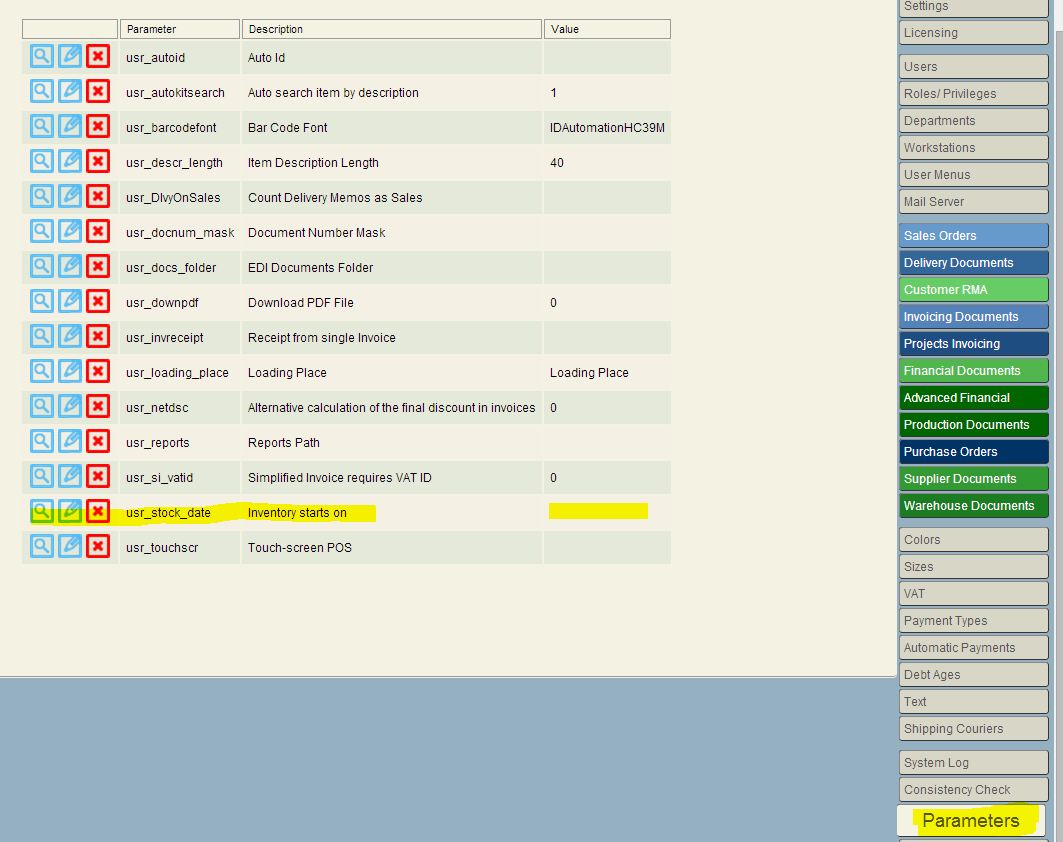
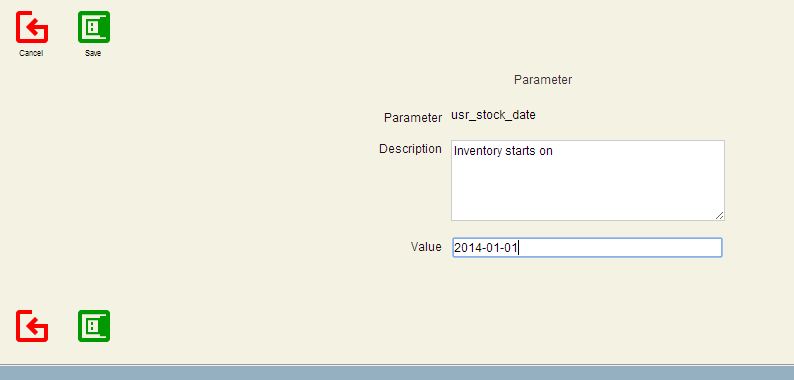
Open the Admin | Parameters menu and edit the usr_stock_date parameter.

inventory-stock-date-zero

Specify the Inventory Beginning Date, in the form YYYY-MM-DD.  This will be the date from which the transactions are to be taken into account for inventory purposes.

In this example, we have a database with about four years of stock transactions and want to make the system consider only transaction from 2014-04-01 onward.

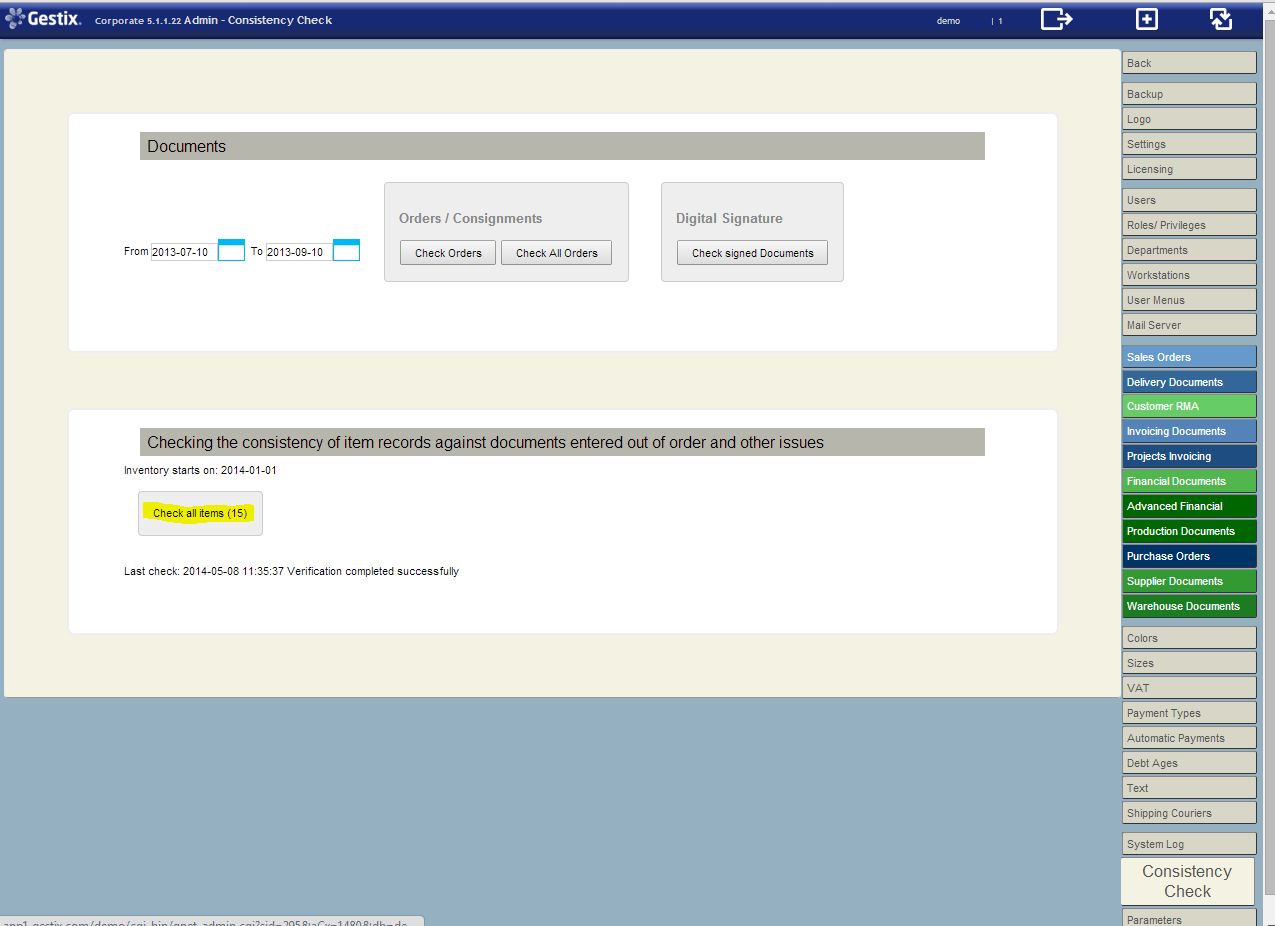
Save the parameter and open the Consistency Check menu.


consistency-check


Press the “Check all items” button.

check-finished

Press the Progress button to check the progress.

gestix-checking-consistency


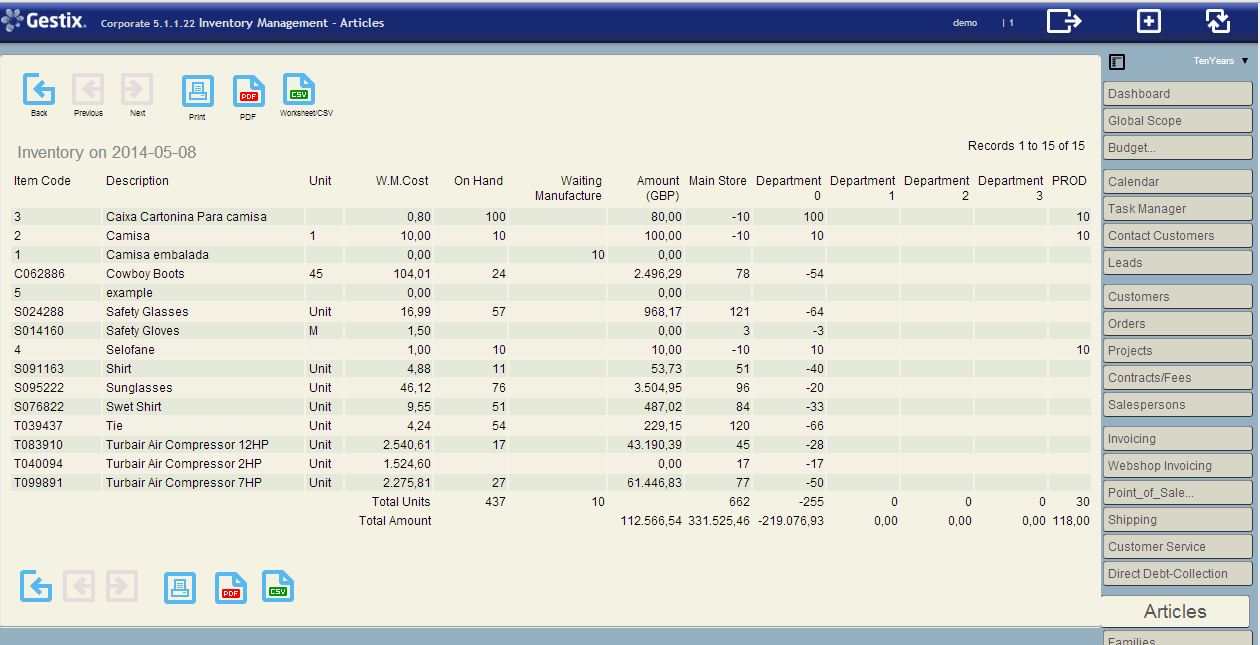
When finished, get the inventory report. It will show the expected results.

stock1

There are two ways to enter the counting into the system on the new Inventory Beginning Date. One is by entering warehouse receipts or purchases. Another one is to import an excel-csv file with inventory count for each article, using the Data Import menu of the Gestix Enterprise. In this case the default warehouse will be used to enter the stock counts.

Please contact our technical support for more information: http://www.gestix.com


Gestix – Certificados AT (Autoridade Tributária)

O Software Gestix foi objecto de prévia certificação pela Autoridade Tributária e Aduaneira (AT), em 26 de Novembro de 2010. Foram obtidos os seguintes certificados:

Gestix Enterprise Certificado nº 0394 (soluções standard médio a alto porte)

Gestix Business Certificado nº 0395 (soluções standard baixo porte)

Gestix POS Certificado nº 0396 (soluções verticais de ponto de venda e auto-venda)

Gestix Life Certificado nº 0397 (soluções verticais Saúde, Hospedaria e Hotelaria)

A marca Gestix conta com um registo limpo de problemas fiscais com o software, e é exemplar na atempada disponibilização de atualizações aos seus utilizadores, conforme as normais legais em vigor.

Nos países em que não o software em causa não está sujeito a certificação, o Gestix continua a conferir ao utilizador a opção pelo nível de segurança e de controlo mais conveniente para a sua empresa.


From the lead to order to purchase to payment: Gestix ERP with CRM

Management

Define the budget for the company


Operations

Minimize stock/storage of goods.

Sales Routine:

Capture the lead (manage it, follow it up, and so on up to the quote/cost estimate phase)

Send the quote or cost estimate

Follow up the customer (call him, take note of any comments, gather team to discuss negotiation, and so on.)

Get the order

Purchasing Routine:

Estimate the replenishment needs

Place the purchase order to the supplier/vendor (PO)

On reception of the goods:

Receive the goods from the vendor (validate against the PO)

Deliver to customers

On collection from customers

On payment to suppliers, commissioners, payroll

Conclusion. The preliminary study of the activities of the company is focused in identifying critical factors and providing training guidelines for an efficient coverage of the various activities of the business.


How to load item data from CSV file into your ERP software

This example shows how to import data as Attributes assigned to each Article record. Attributes are user-defined fields that extend the ones included in the article record, and can be used in data-analysis and reporting.

Using Attributes to classify items

Problem:

Transfer 600 thousand items into Gestix, with part-no, description, and condition, among other data that will be discarded.

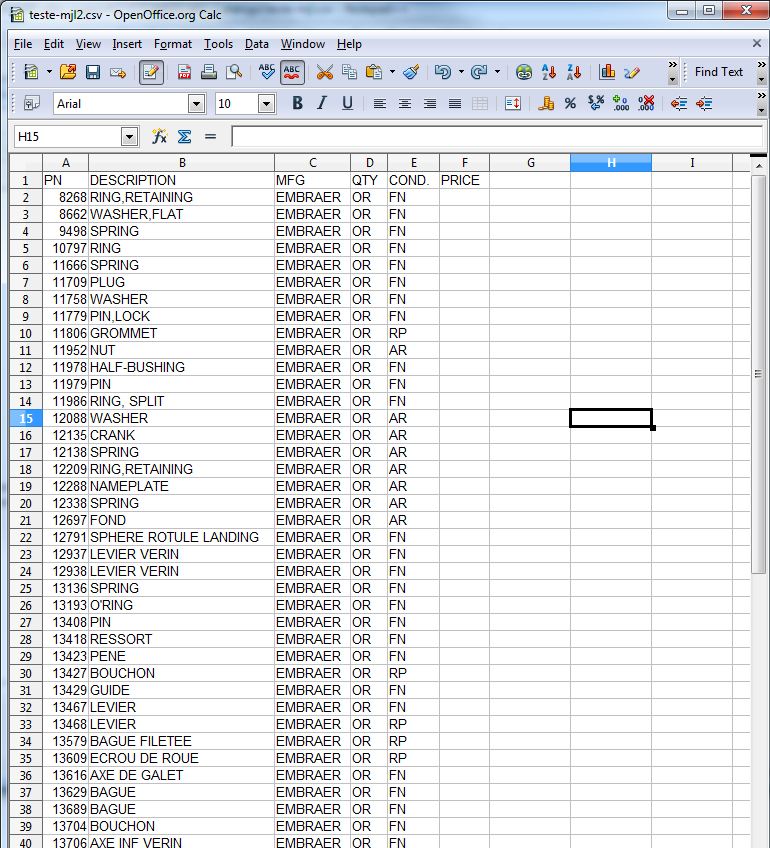
The original file looks like this:

article-data-import-the-CSV-file

The PN field is to be stored as the Supplier’s Item Code. The value of the DESCRIPTION column goes to the field with the same name in the Gestix’s Article record, and the value of the MFG field goes to the Family field in Gestix.

The field COND, representing the condition of the part (Factory New, Repaired, etc), is to be stored as an Attribute of the item. The possible values in this case will be:

FN – Factory New

RP – Repaired

AR – As Removed

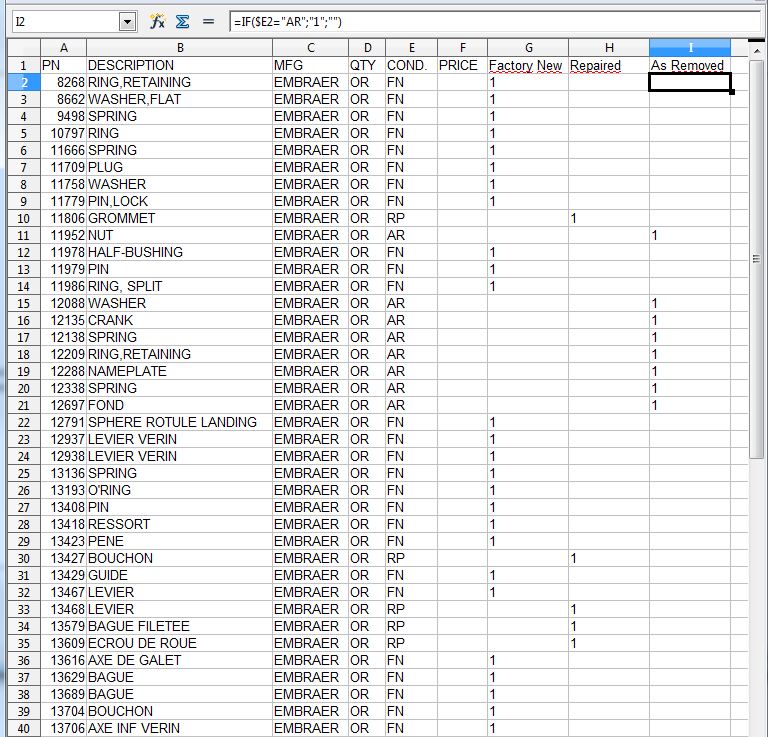
In order to assign attributes to articles using the Data Import menu of Gestix, the data has to be rearranged so each attributes comes in its own column in the worksheet. The column name will become the attribute name, and the column value for each item will be 1 if the attribute is to be assigned to the item, 0 or blank otherwise. We use the worksheet formulas to aid in this task, and the resulting, modified file looks like this:

Data rearranged
Data rearranged

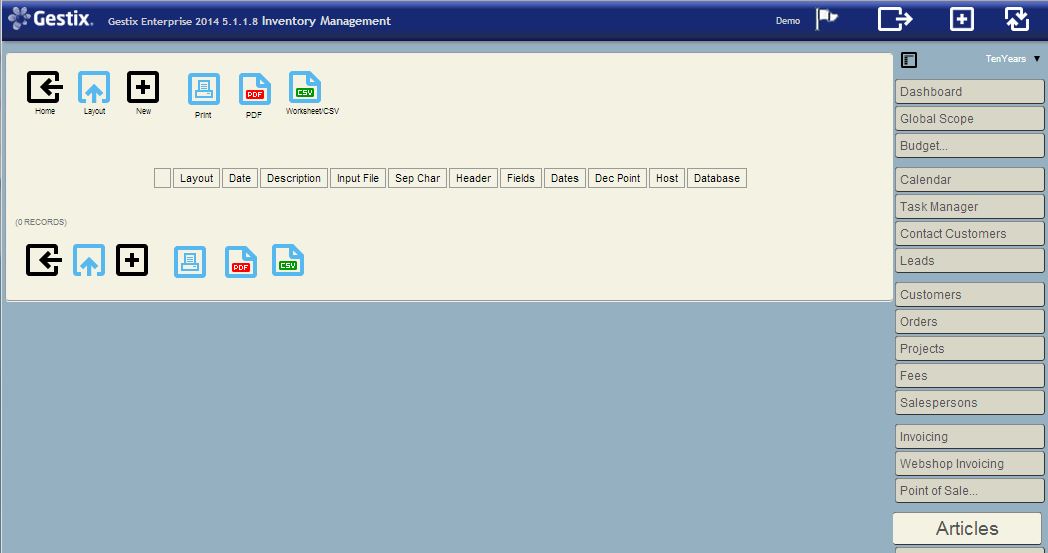
Then, after saving this file as CSV again, open it from the Gestix, Articles, Data Import menu. Add a new layout for this CSV file (tap the plus sign +).

The Data Import menu in Articles

Then, save it and open it by clicking the row or the small arrow in it.

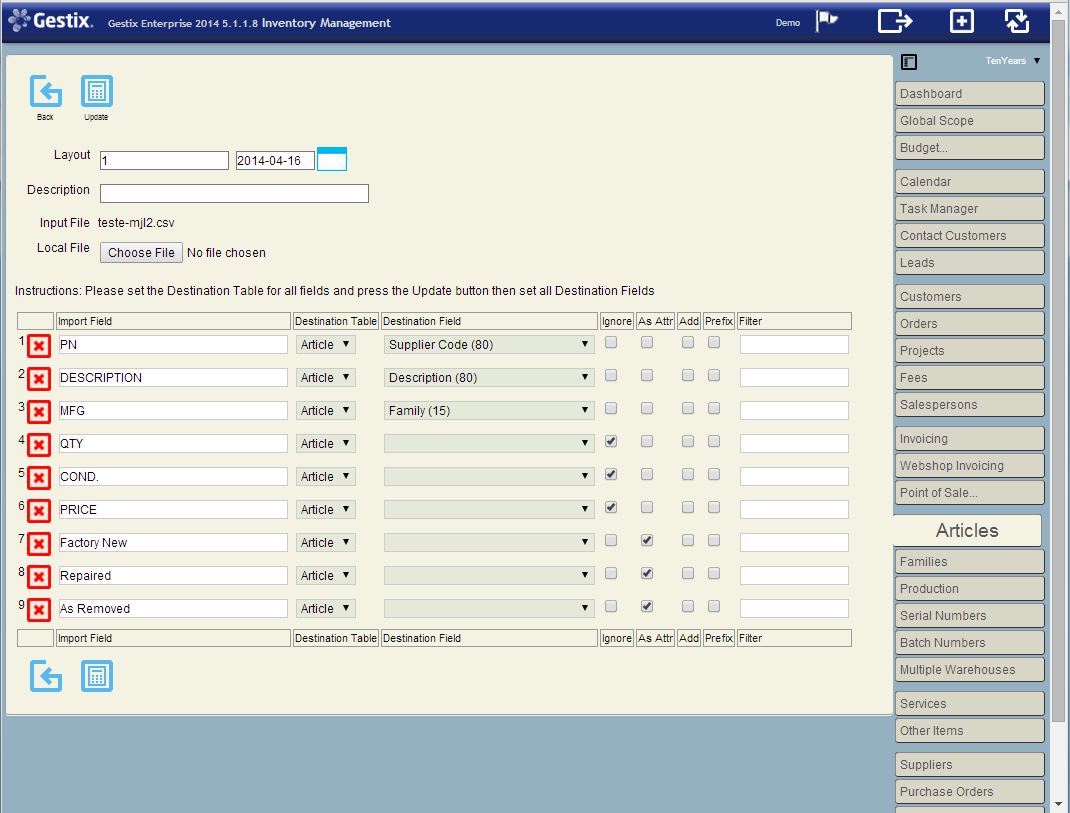
Finally, set the destination table and fields for each import field (each import field corresponds to a column in the input worksheet). Press the update button between steps, whenever necessary.

aticles-data-import-edit


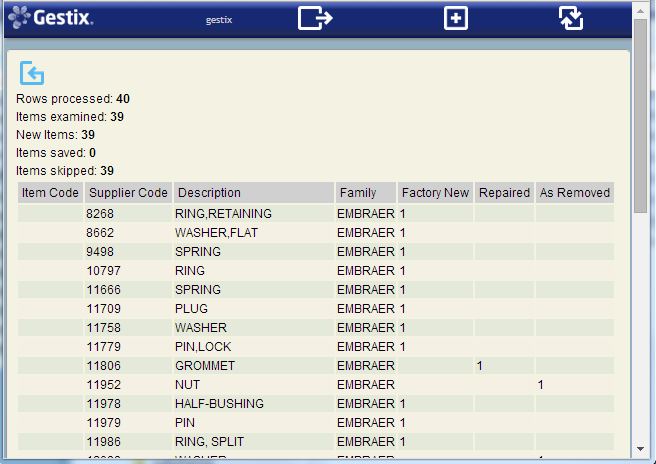
Then press the Test button to preview the results.

Preview the results pressing the Test button

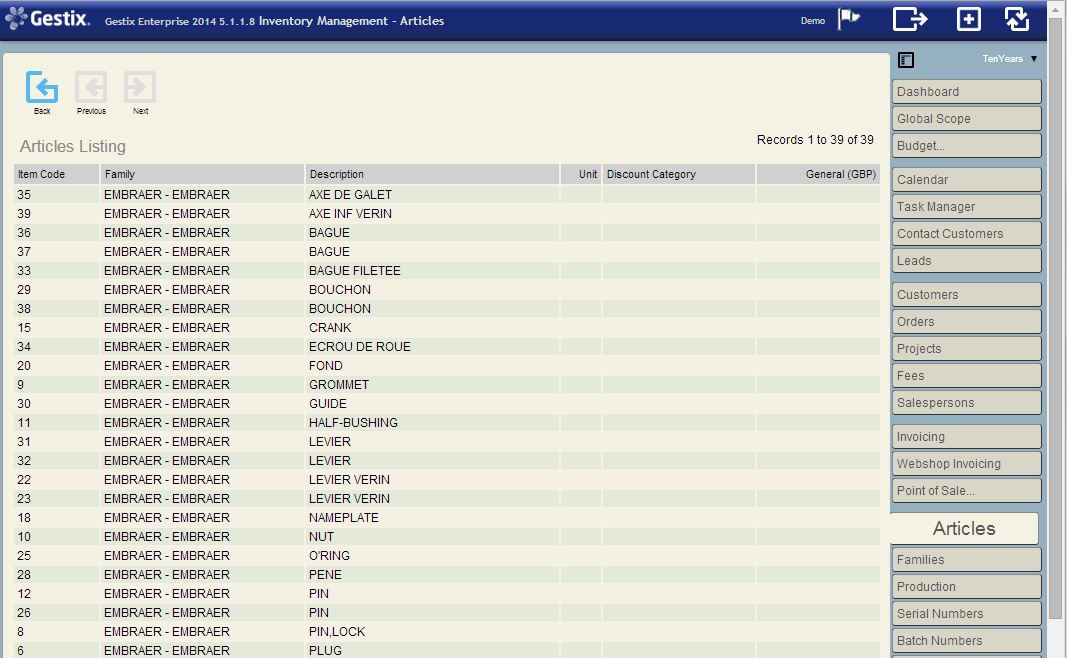
If the data displayed look correct, go back and press the Import button. Then check the results. Here we listed the new family EMBRAER, and checked it was alright.

Listing the Embraer family of items just transferred from the CSV file

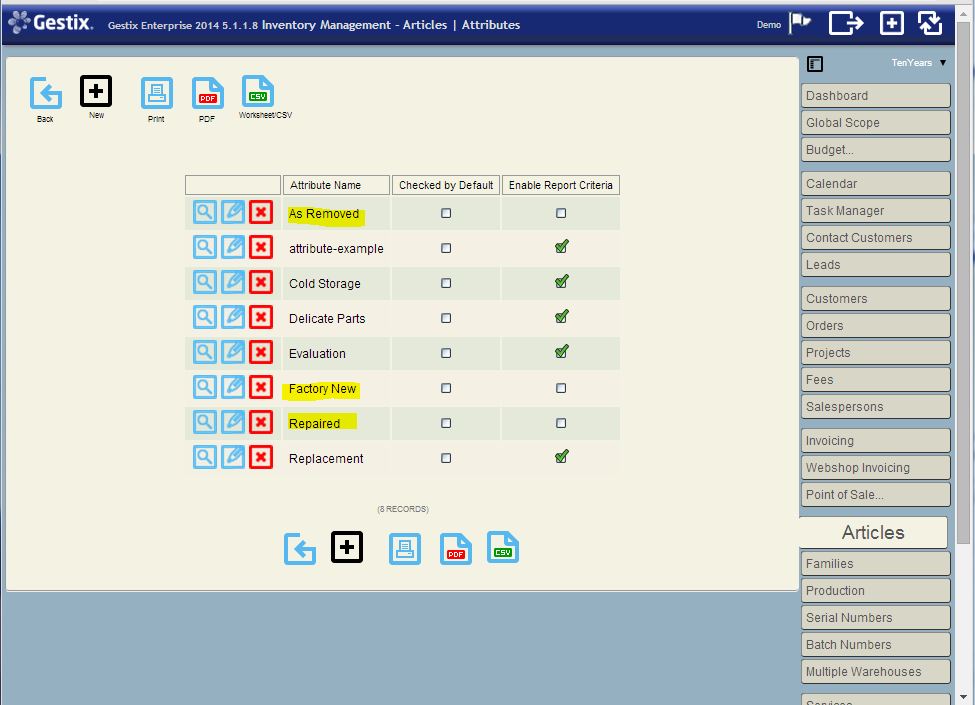
The Attributes menu display the new attributes just created during the data import process.

The new Attributes were created

And it’s done.

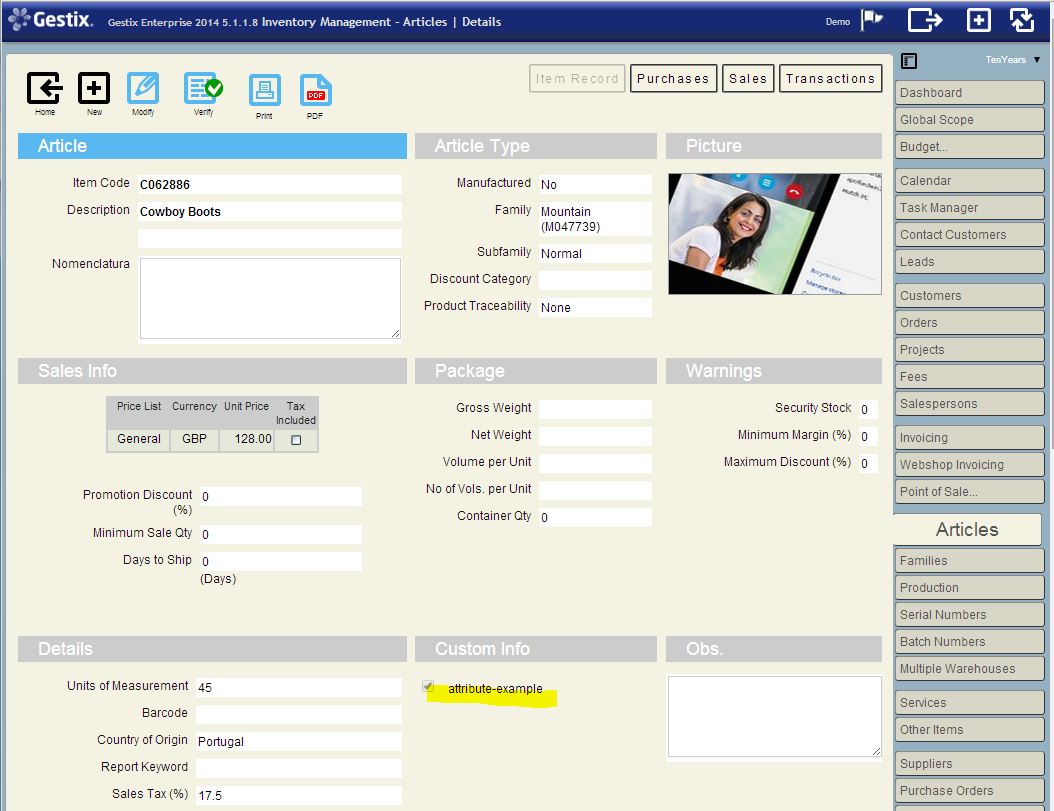
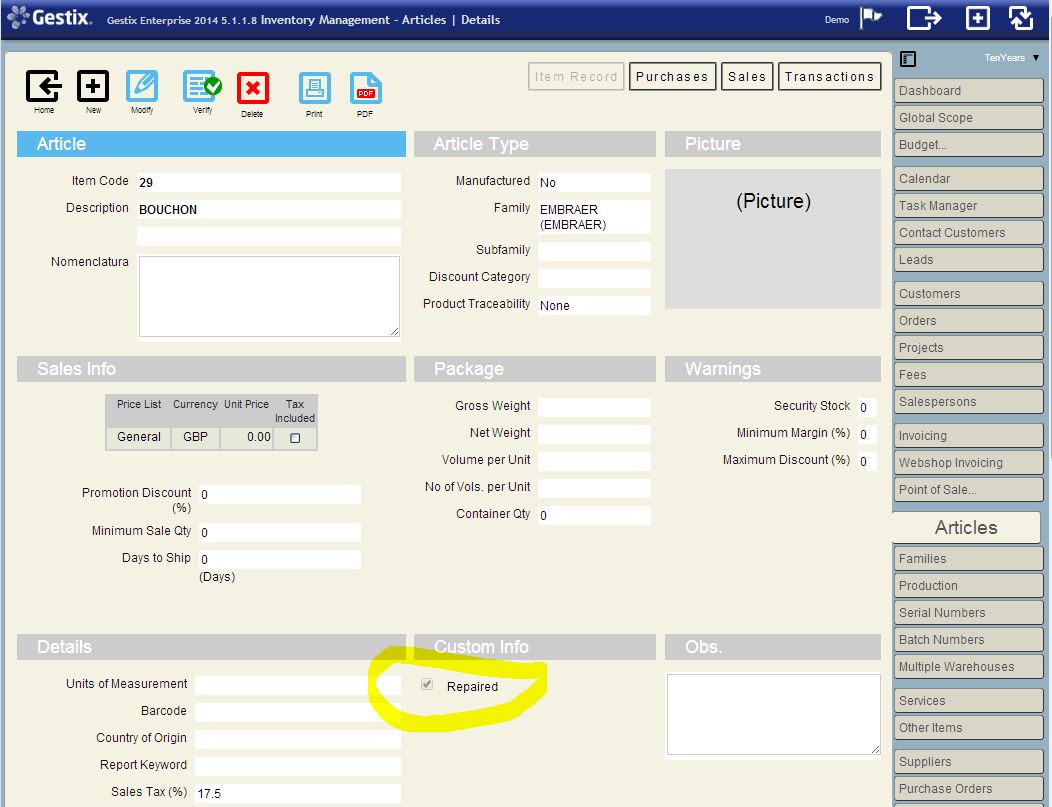
article-details