Gestix ERP/CRM Software
Developed by Westix-TI, Gestix is a pioneering cloud-based business management solution. It was the first of its kind to be sold in Portugal and is now certified across several countries and regions.
About Westix-TI
Founded in 2004 by two experienced enterprise software engineers, Westix-TI builds on the legacy of GIPS – Gestão Informática e Personalização de Sistemas, which developed the first version of Gestix for Unix platforms. Key clients have included Regra S.A., Compta S.A., and The Portuguese Government.
Why Choose Gestix?
Performance: Gestix uses C++ for optimal speed and resource efficiency, with versions available for Windows, MacOS, and Linux.
Scalability: Capable of managing hundreds of stores, it supports centralized inventory management, with a single SAF-T file for all branches.
Global Reach: Multilingual and certified for compliance in various regions.
Testimonials
“Gestix was the only software that allowed us real-time visibility of store sales.”
– Bruno Borges, iServices
“Billing seemed complicated, but thanks to their support, it’s easy.”
– Miguel Guilherme, Actor
“Gestix is my go-to for customer management.”
– Beatriz Martins, Remax Prisma
“We adopted Gestix for its cloud availability before others.”
– Francisco Fernandes, Proxidados
“It’s the best warehouse management software I know.”
– Alessandro Gazzola, Alimentari-GT
Flexible Deployment Options
On Premises: Install and maintain Gestix on your own hardware.
Private Cloud Server: We manage Gestix on your exclusive cloud server.
Software as a Service (SaaS): Enjoy fully managed, cloud-hosted access from any device.
Usually four types of situations happen when managing the sale and repair of technological devices:
Sale of new devices with warranty provided that is controlled by serial number (or IMEI)
Return of devices for refurbishment and resale as pre-owned (these items require as well individual control for warranty purposes)
Sale of refurbished devices the general public under the Used VAT Regulations
Device repair with our without warranty
With Gestix you can control and manage your stock, buy and sell devices using serial numbers or IMEI.
Sell used and/ or refurbished devices such as Smart Phones, Smart Watches and others. Follow the steps below.
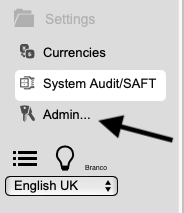
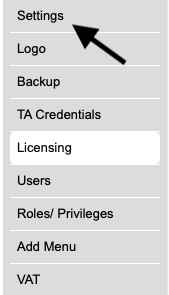
Select Admin
Select Settings
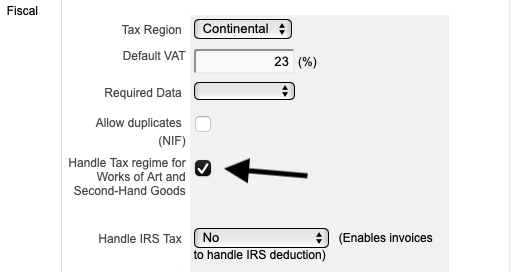
Select the option Handle Tax regime for Works of Art and Second-Hand Goods
After setting up your profile, your business is now able to buy new or used items, in small or big quantities, sell new or refurbished items with or with out serial number and even offer a repair service.
It is a very simple process to buying an item that is controlled by a serial number IMEI, to later sell:
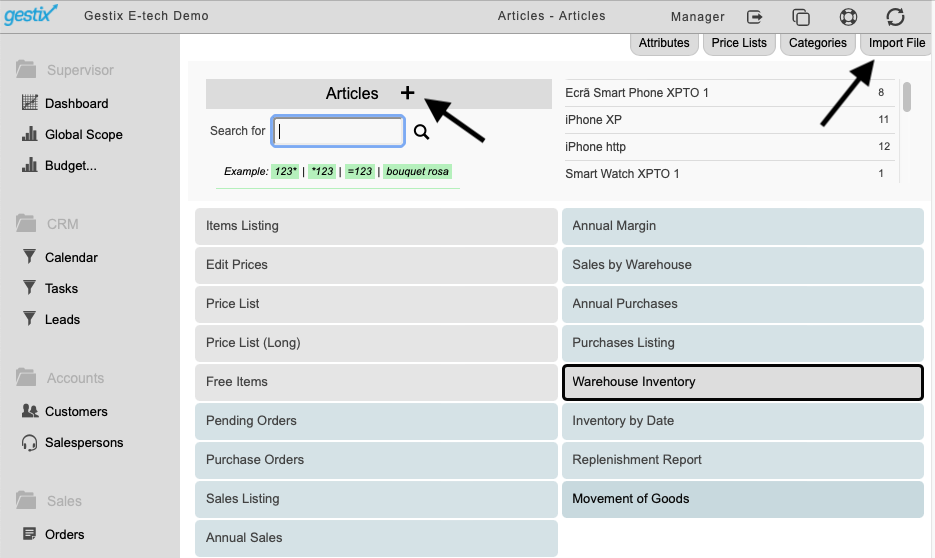
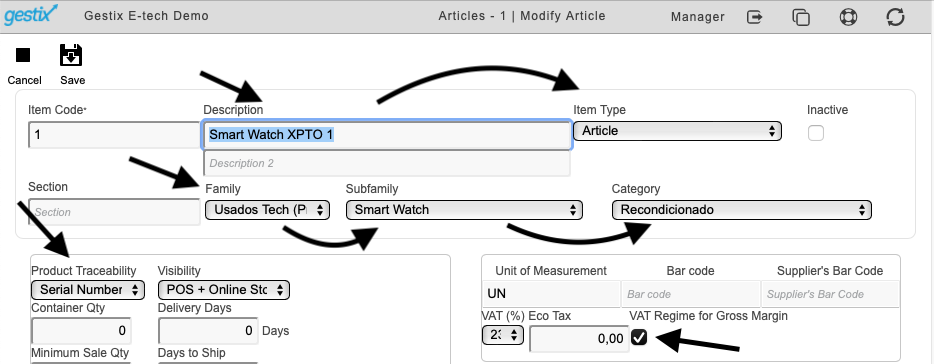
1st – Create a item, or you can import a list of pre-existent item in a CSV file, and make the necessary changes, as showed in the image below,
2nd – if the items you are creating are new, do not select the option “VAT Regime for Gross Margin” this option should only be used for used items.
Your items are now setup,
Let’s see how to buy a used item and sell it as a refurbished item.
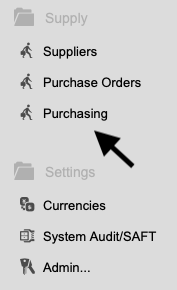
Select Purchasing from the Supply menu
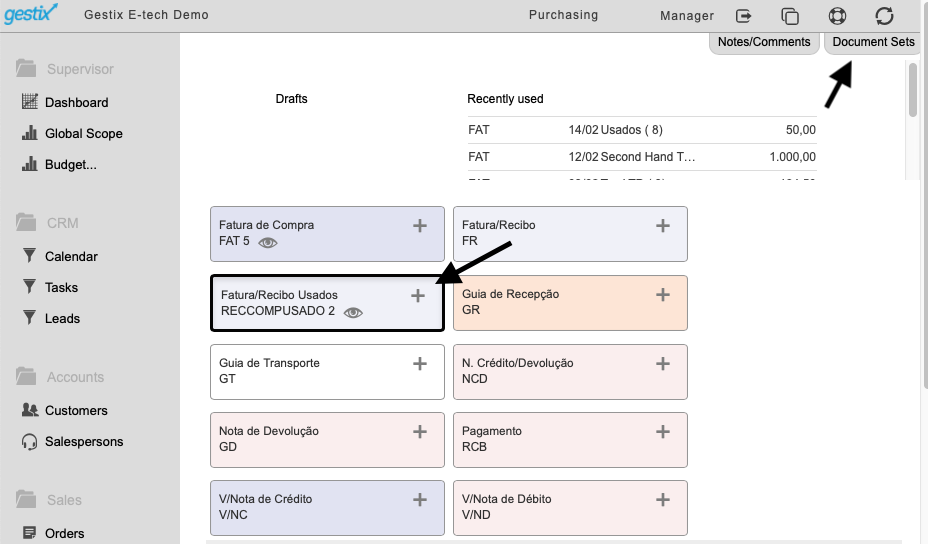
In the menu Purchasing you can create as many new set of document as you need, or you can use the preset documents already in the data base.
Use the + sign to create a new Invoice/receipt, fill in the necessary information, bearing in mind that you will need the serial number or IMEI of the item you are buying , at the end click save.
For your and the seller’s control, the serial number is recorded on the document.
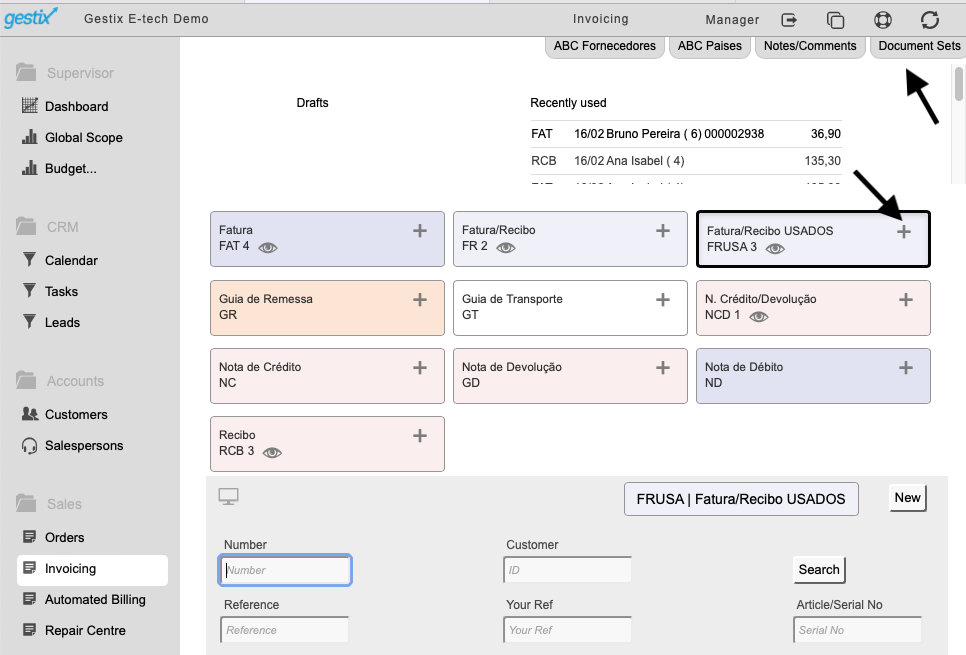
To sell these items, as in the previous step, we created a new Document Set within the invoice menu, you can create one or as many as you need or you can use the predefined ones.
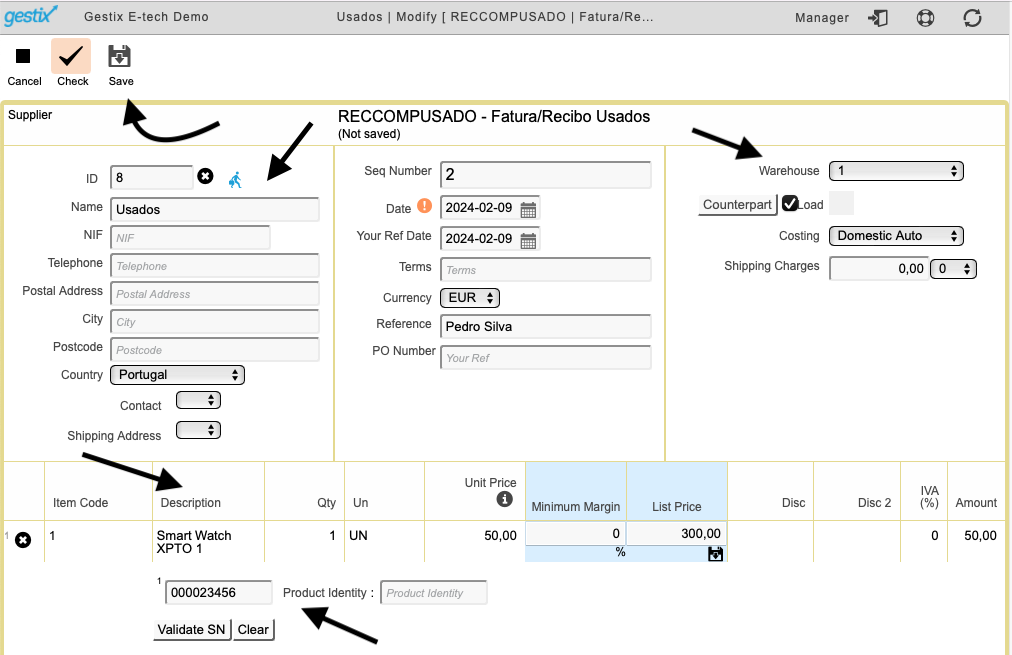
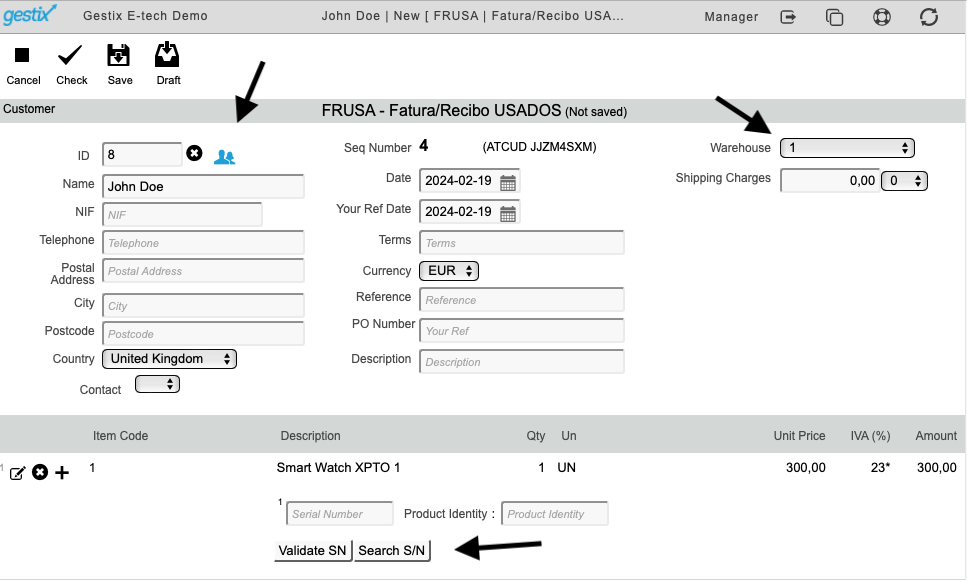
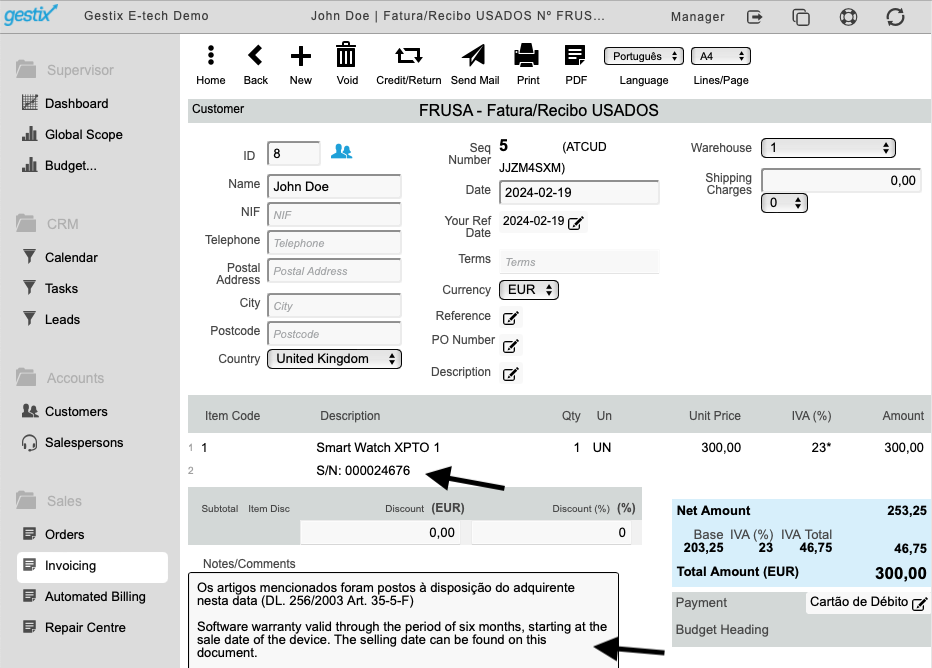
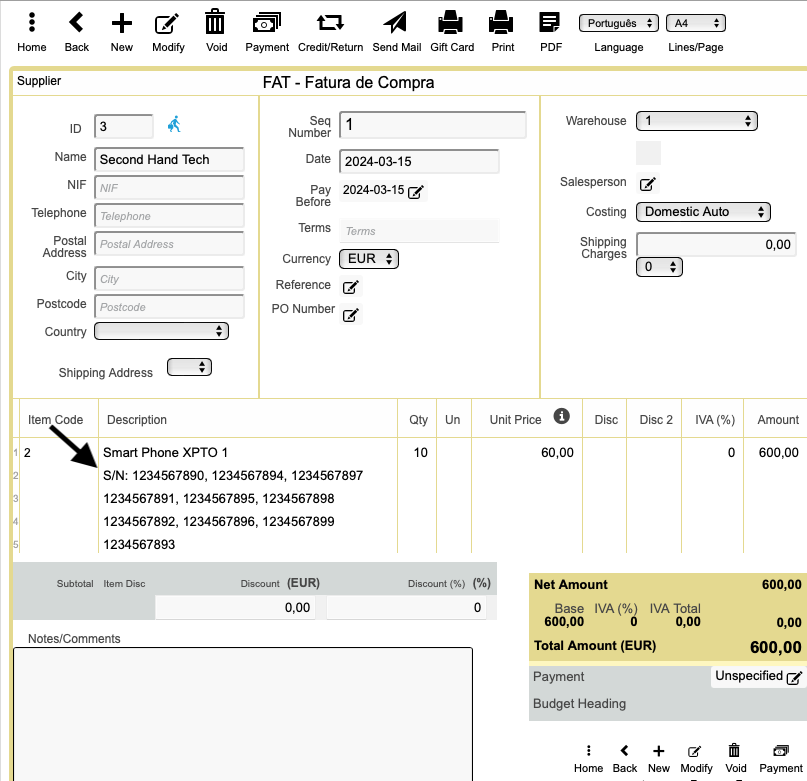
To create a new Invoice/Receipt (as in the exemple below), click on the + sign, fill in all of the necessary information, please be aware that the Serial Number or IMEI for the item you are selling is required,
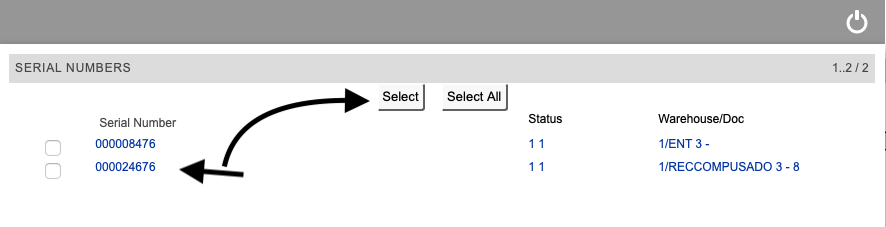
You can either enter the Serial Number manually or use the search button, where all of the available serial numbers associated with the item you are selling will be listed, you just have to select the correct one.
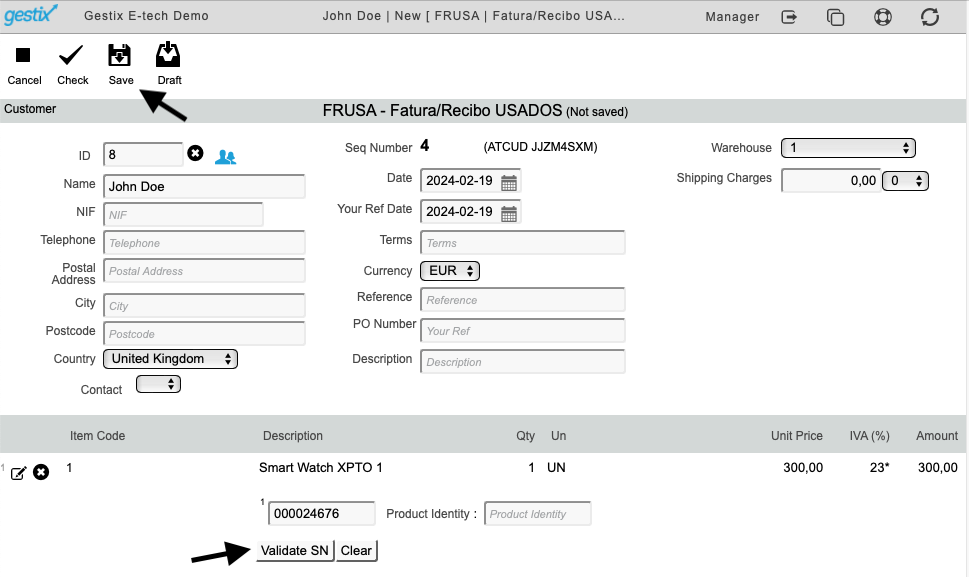
Validate the Serial Number and save the document.
The Invoice/Receipt is now created (for your control, the serial number is included within the document), if the item is being sold with warranty, you can add the details in the “Notes/Comments” area.
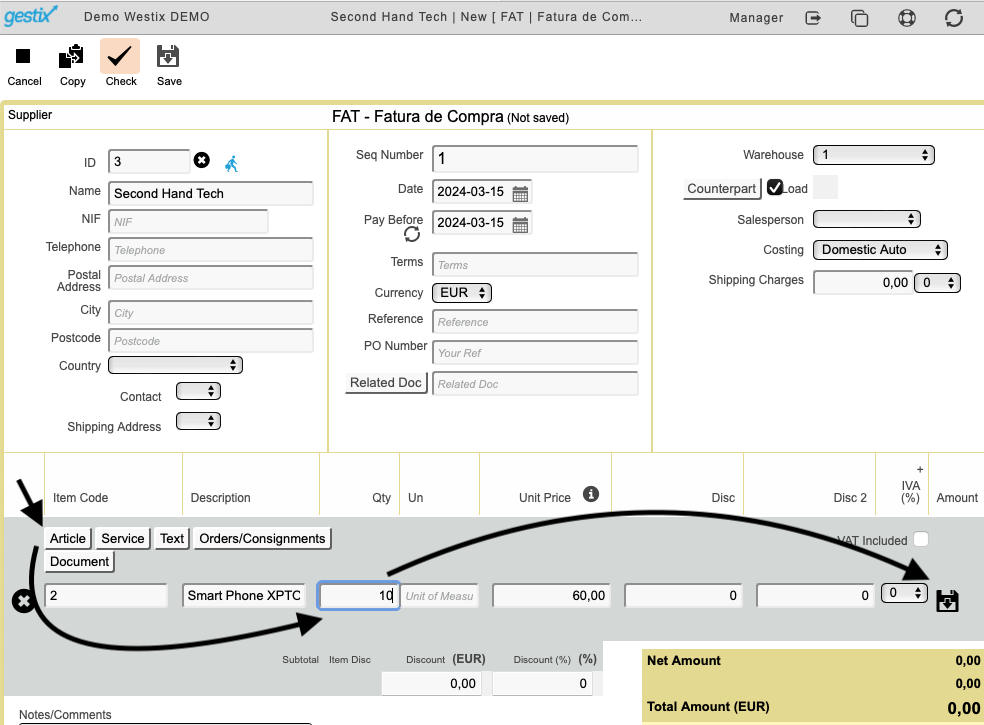
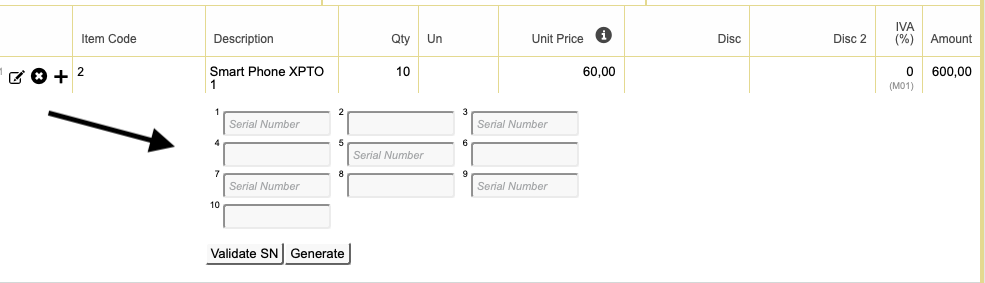
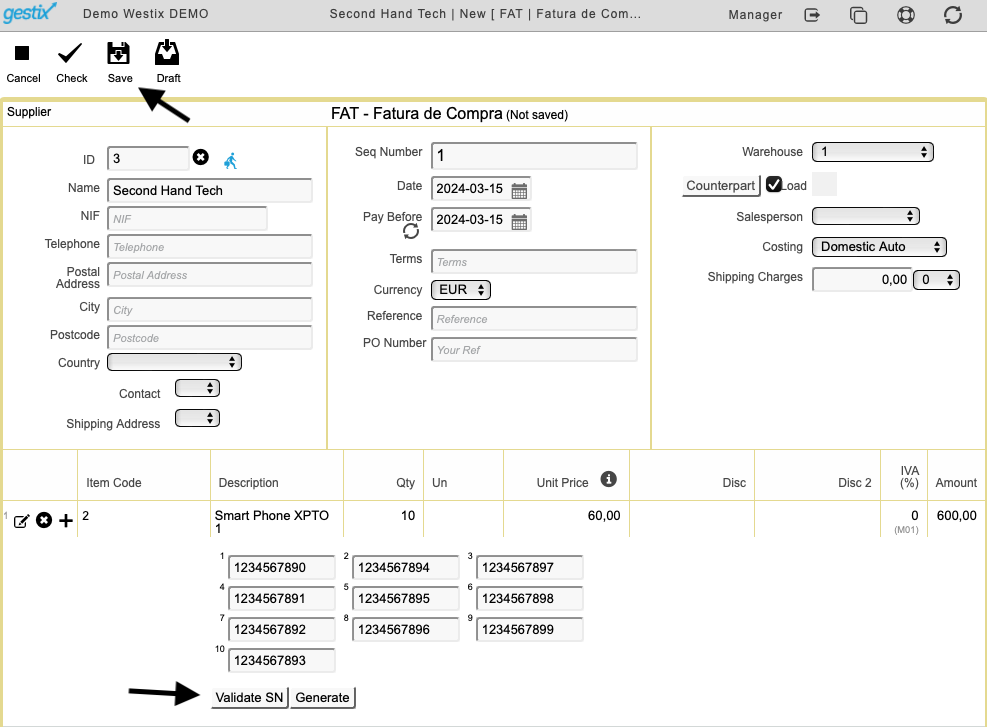
PURCHASE OF ITMES IN LARGE QUANTITIES
The process for buying large quantities of items is very easy and a quick process, you should proceed as per above, you just need to enter all of the Serial Numbers for the items you are receiving, as shown in the following images:
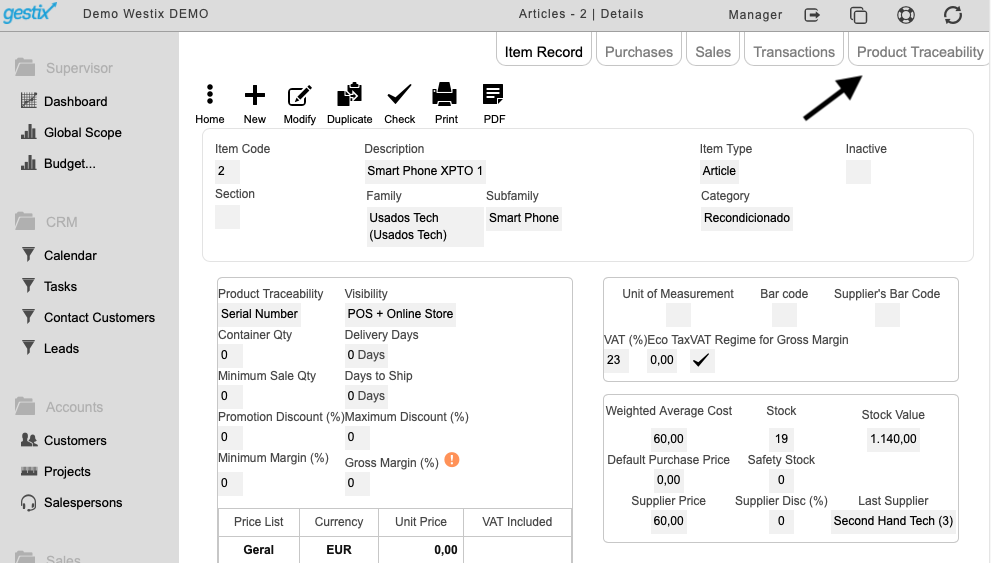
CHECK THE SERIAL NUMBERS OR IMEI OF AN ITEM THAT ARE AVAILABLE ON THE SYSTEM
In the Products menu, select the option Articles, select the wanted item and click on Product Traceability option
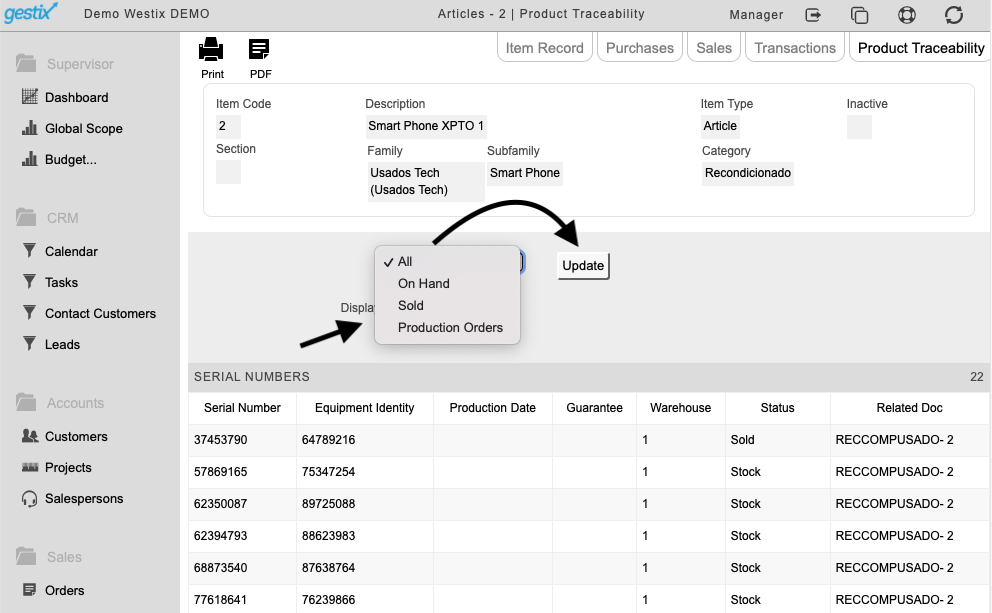
All of the Serial Numbers that have ever been processed within Gestix will be listed as shown in the image below, you can customize your search, by sold, on hand or production orders as per image below:
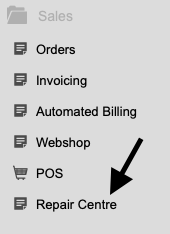
EQUIPMENT REPAIR
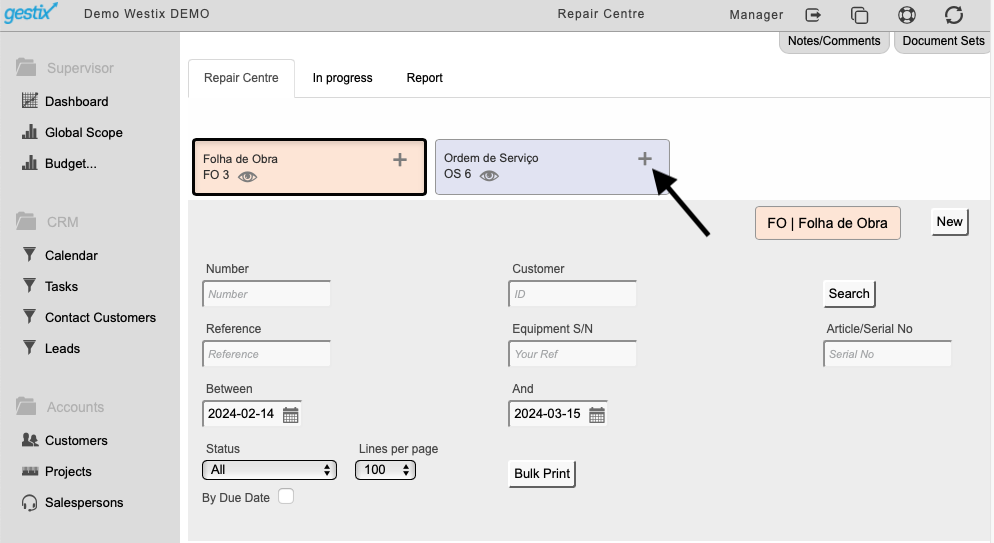
In the Sales menu, select the option Repair centre
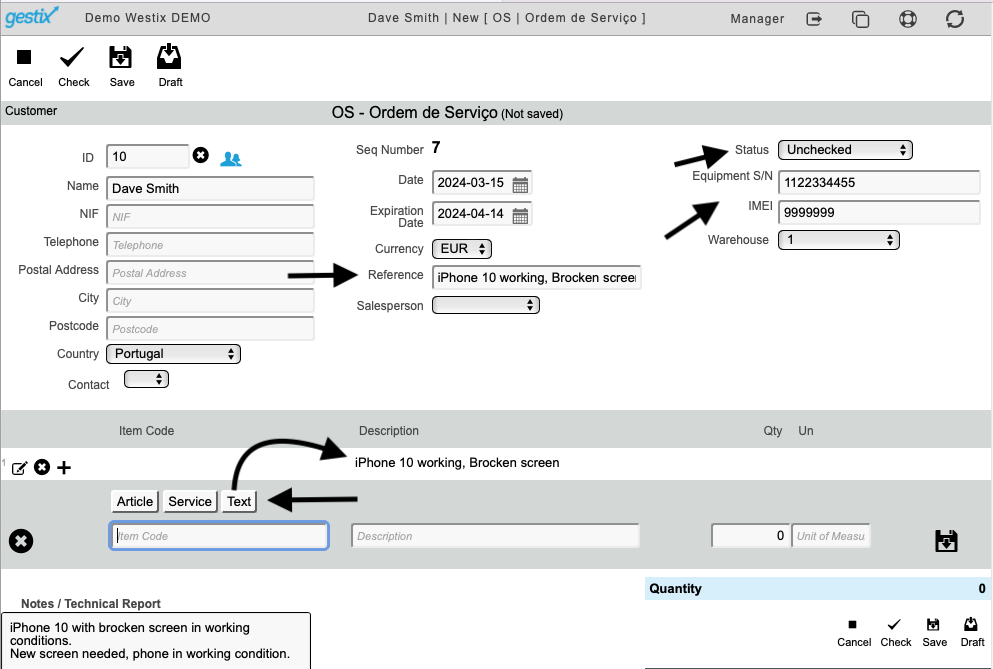
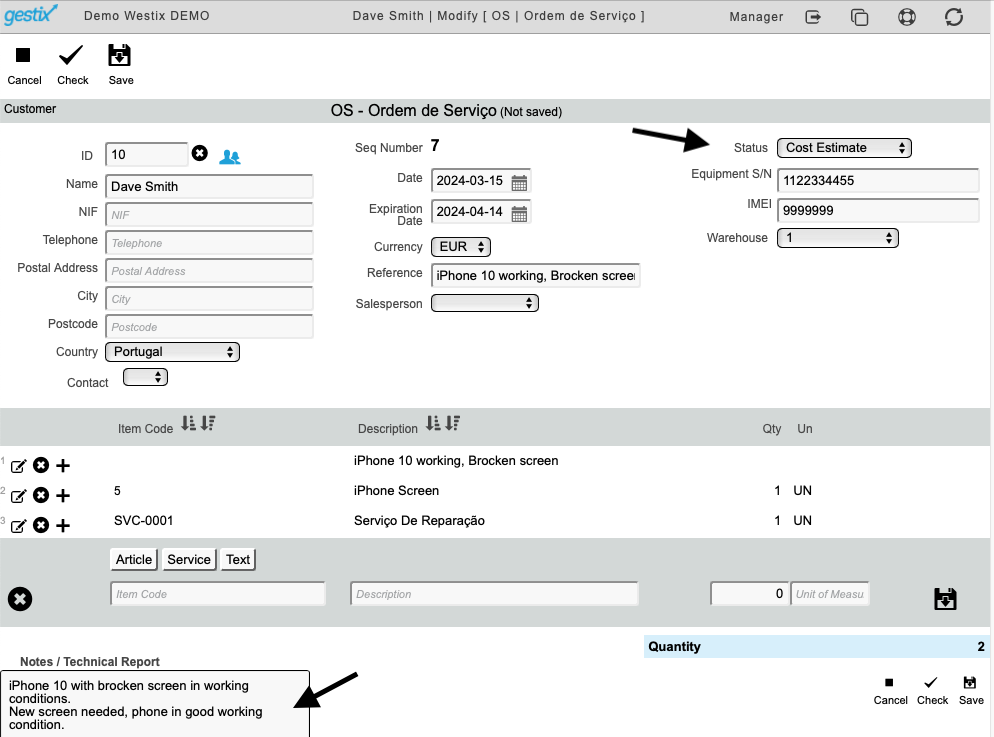
The first step will have to be to create a service order to record the details of the repair and the item to be repaired (including the Serial Number).
When creating the Service Order, in the status area select Unchecked
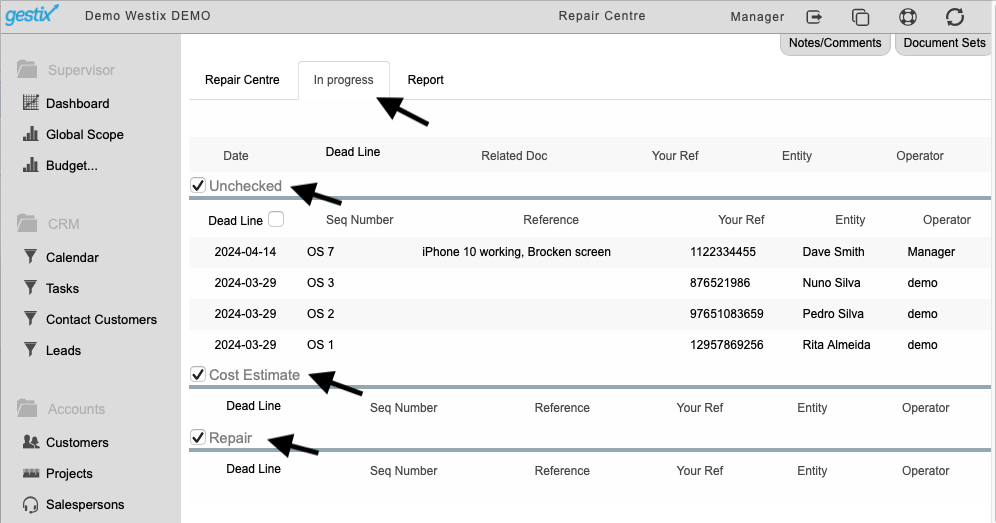
After saving, you will be able to check and trace the repairs you have on the system and the stages they are in.
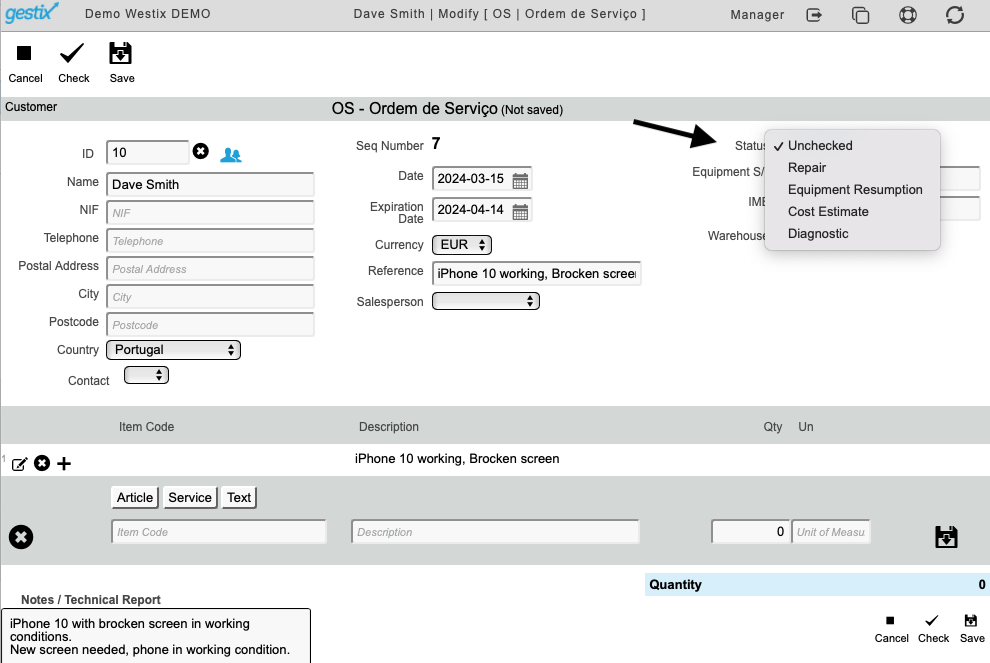
The status of the repair can be updated, for that, go back into the Service Order and change the status situation for the desired one
To finalize the quote, a technical report should be included and save at the end. You can now print or send it directly to the customer.
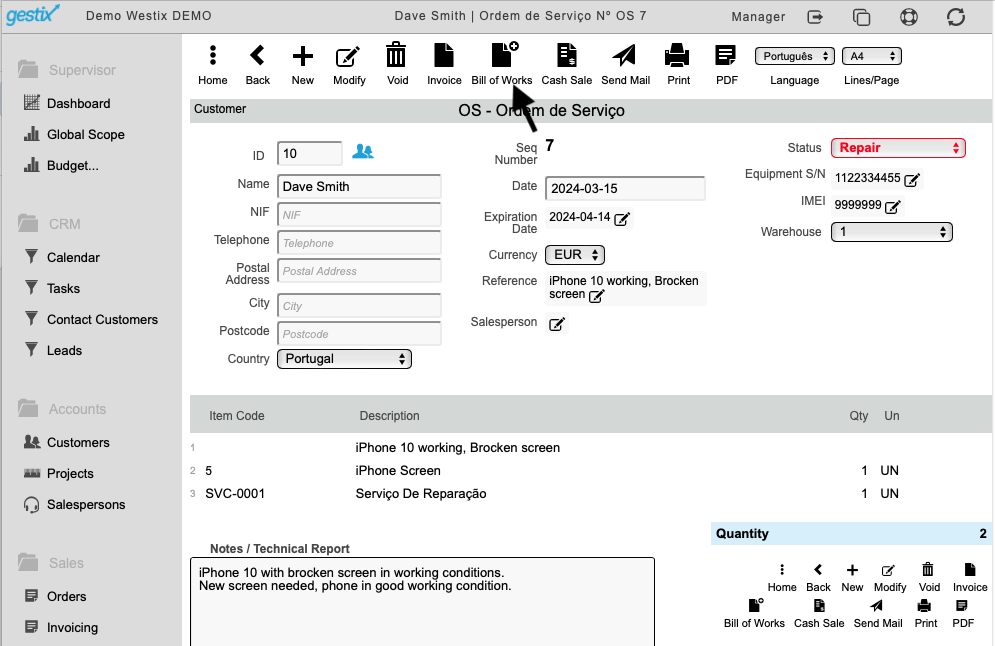
After the quote is approved by the customer, change the status to Repair and save. After saving at the top of the page you will have the option Bill of Materials, click on it
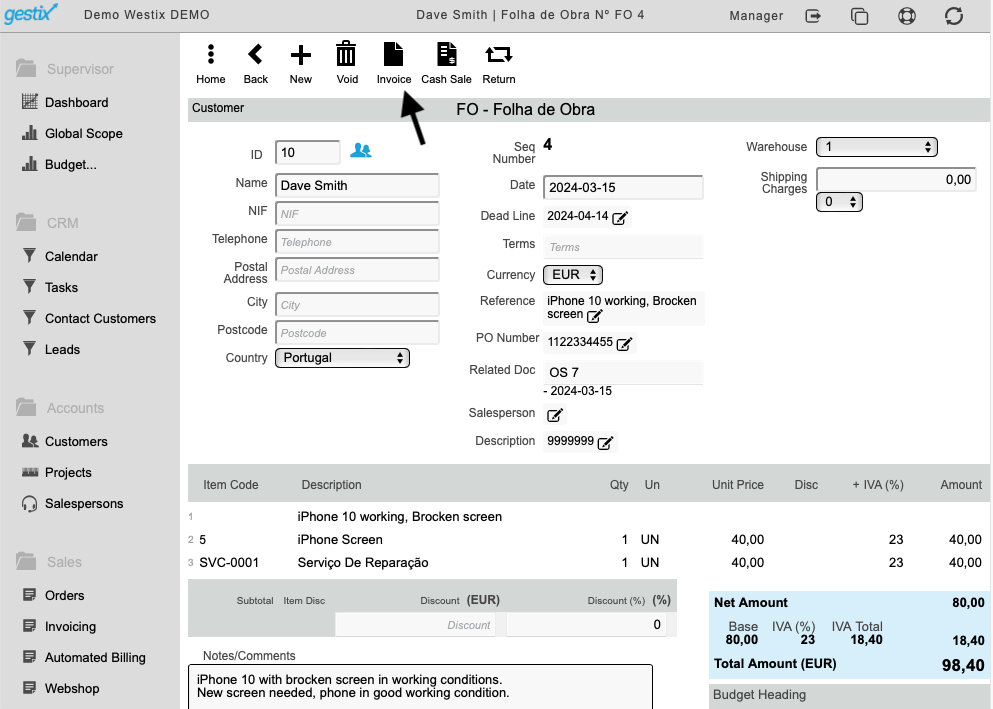
Check if all of the information is correct, add prices of the services provided and materials used. all left to do is to invoice your customer, you can do it by using the option Invoice at the top of the page.
Offer Voucher at Point of Sale and in Billing with POS
In the Global View, show the Net of VAT in the analytical summary
Customs Code – New optional column per document line
Correction of difficulty that existed when entering a Postage value, which did not immediately assume the respective VAT rate
New JEDI Electronic Invoice (JSON EDI) option for direct integration of documents between companies using Gestix ERP
Project Profit Margin was not accurate when partial credit notes were involved
Document Series ID with up to 15 alphanumeric characters
User-configured buttons on the Point of Sale/Touch Screen POS did not assume price at the time of sale
By updating item stock via CSV, it allows multiple operators to work in different stores or warehouses
When importing customer databases via CSV, ignore incomplete records but continue importing the data
Allow changing the payment method in Invoices/Receipts and Receipts if the operator has System Administration privileges, even if the document has already been printed
Gestix API Reference Guide is available from your Gestix Admin | Webshop menu for browsing and for download in PDF format. The API specification in OAS 3.0-style in JSON format is also available for download at this location.
About the vat_included field in the invoice structure:
vat_included
EN
The vat_included field encodes the type of VAT calculation involved in the invoice line, which can assume one of the values 0, 1 and 2, which will be interpreted as follows: “0” – the price value has been entered without VAT in a Document Set configured as Prices without VAT – this mode is when prices are negotiated without VAT – the invoice will print unit prices without VAT. “1” – the price value has been entered including VAT in a set of documents configured as Prices without VAT – the software will subtract the VAT from the unit price before recording. “2” – the price value has been entered with VAT in a Document Set configured as Prices with VAT – this mode is when prices are negotiated with VAT – the invoice will show the unit prices with VAT.
PT
O campo vat_included codifica o tipo de cálculo do IVA envolvido na linha da fatura, podendo assumir um dos valores 0, 1 e 2, que será interpretado da seguinte forma: “0” – o valor do preço foi inserido sem IVA em um Conjunto de Documentos configurado como Preços sem IVA – este modo é quando os preços são negociados sem impostos – a fatura imprimirá preços unitários sem IVA. “1” – o valor do preço foi inserido incluindo o IVA em um conjunto de documentos configurado como Preços sem IVA – o software subtrairá o IVA do preço unitário antes da gravação. “2” – o valor do preço foi inserido com IVA em um Conjunto de Documentos configurado como Preços com IVA incluído – este modo é quando os preços são negociados com IVA – a fatura mostrará os preços unitários com IVA.
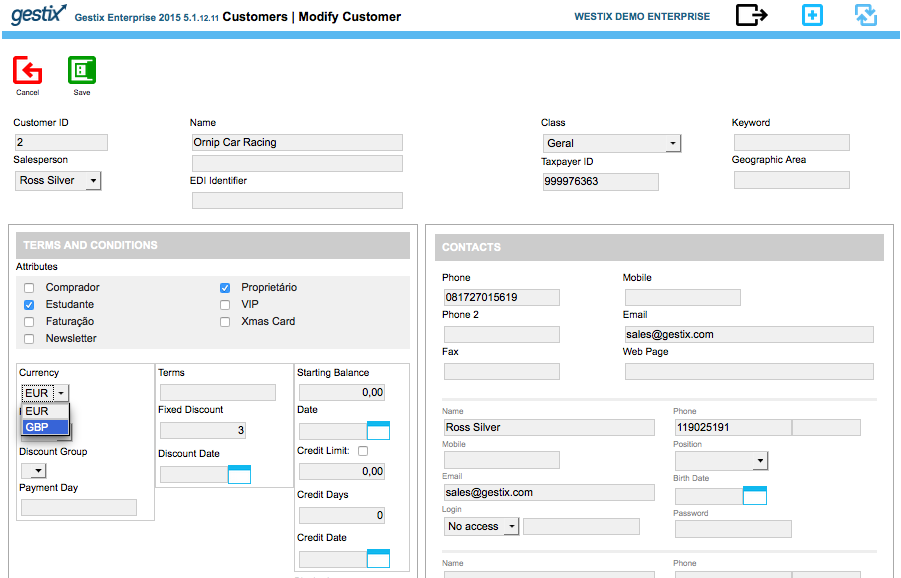
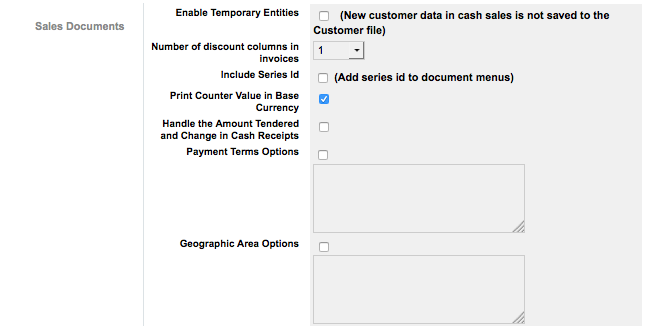
Finally, check the Admin | Settings menu to ensure that the Display Counter Value in Base Currency option is enabled.
Admin / Settings
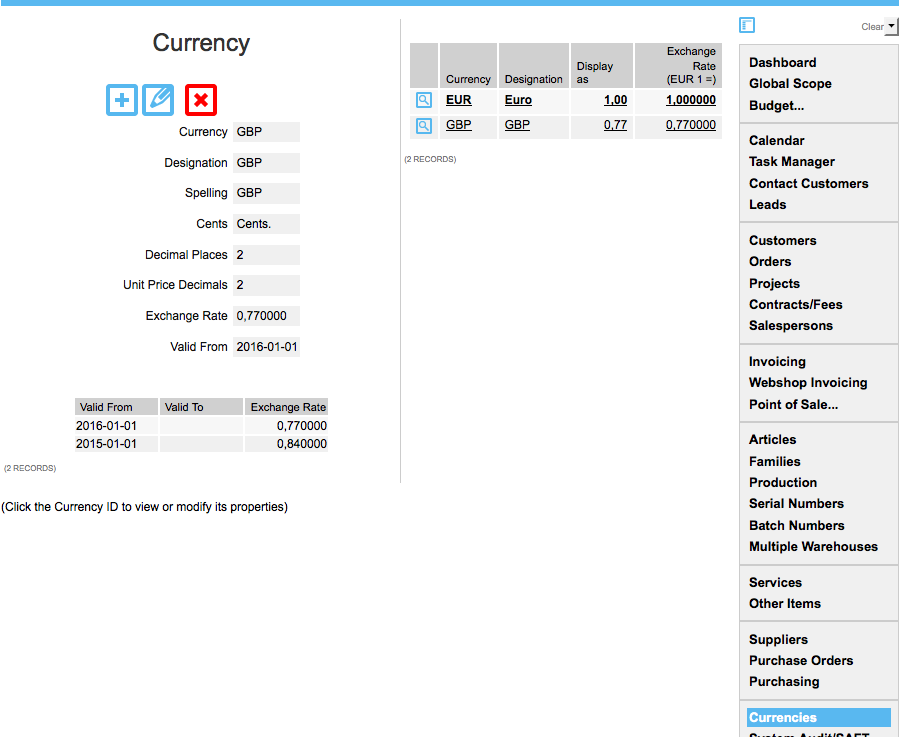
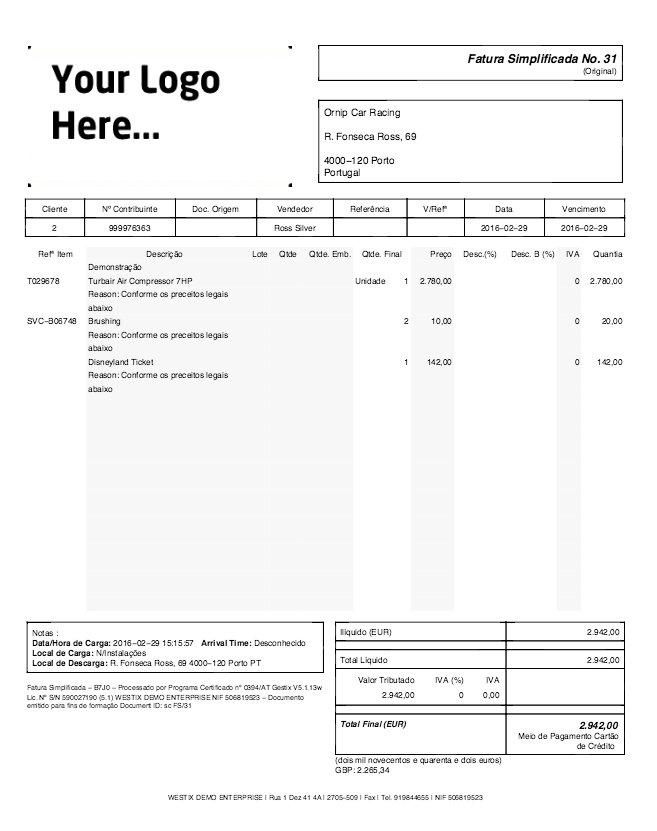
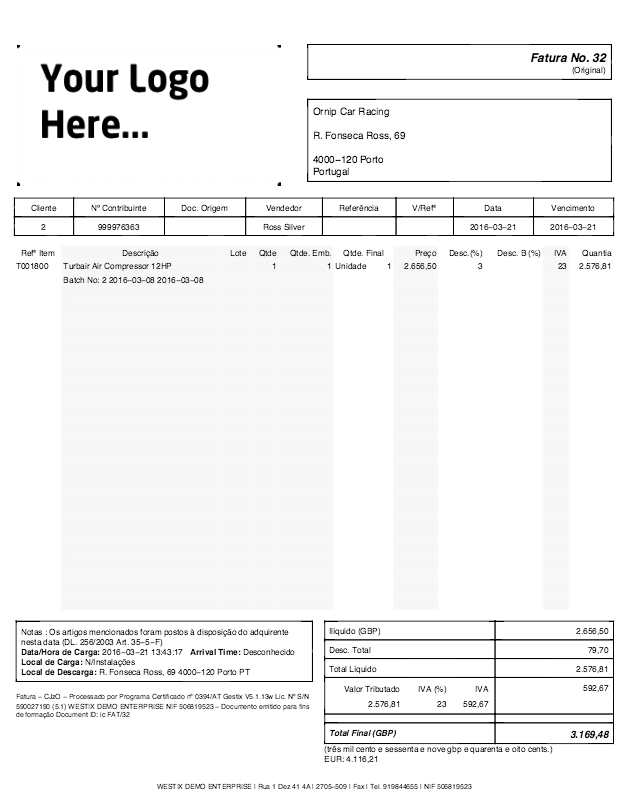
When Display Counter Value in Base Currency is enabled, if the customer’s preferred currency is GBP and the invoice is in EUR (the base currency), the amount in GBP will be printed in the invoice. If the invoice is in GBP, the amount in EUR will be printed instead.
Invoice in base currency (EUR), customer’s preferred currency is GBP
Invoice in GBP, base currency EUR, don’t care customer’s preferred currency
Any questions or comments? please submit them below.
With the Gestix ERP you can easilly issue a payment receipt for part of an invoice.
Here we go through the steps to process a customer payment, from the Invoicing menu, whereas a similar procedure would be performed for processing payments made to suppliers from the Purchasing menu.
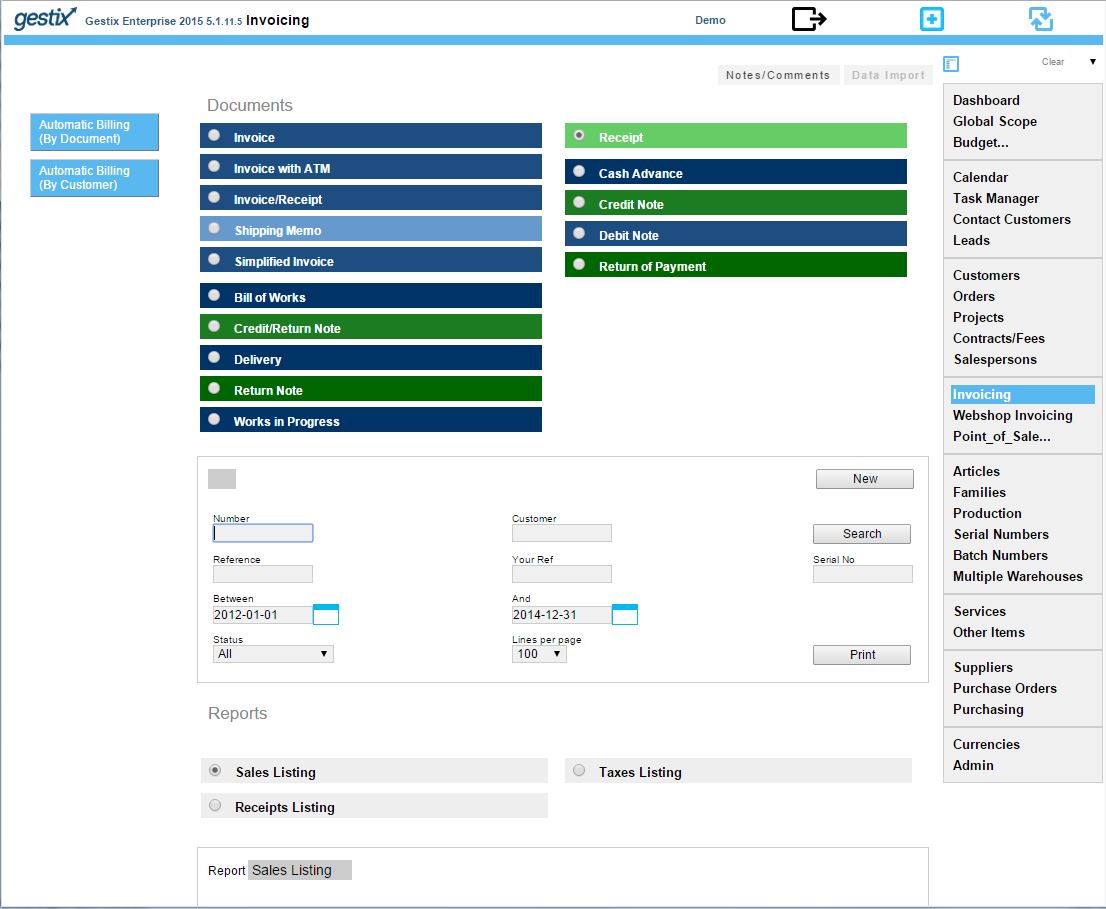
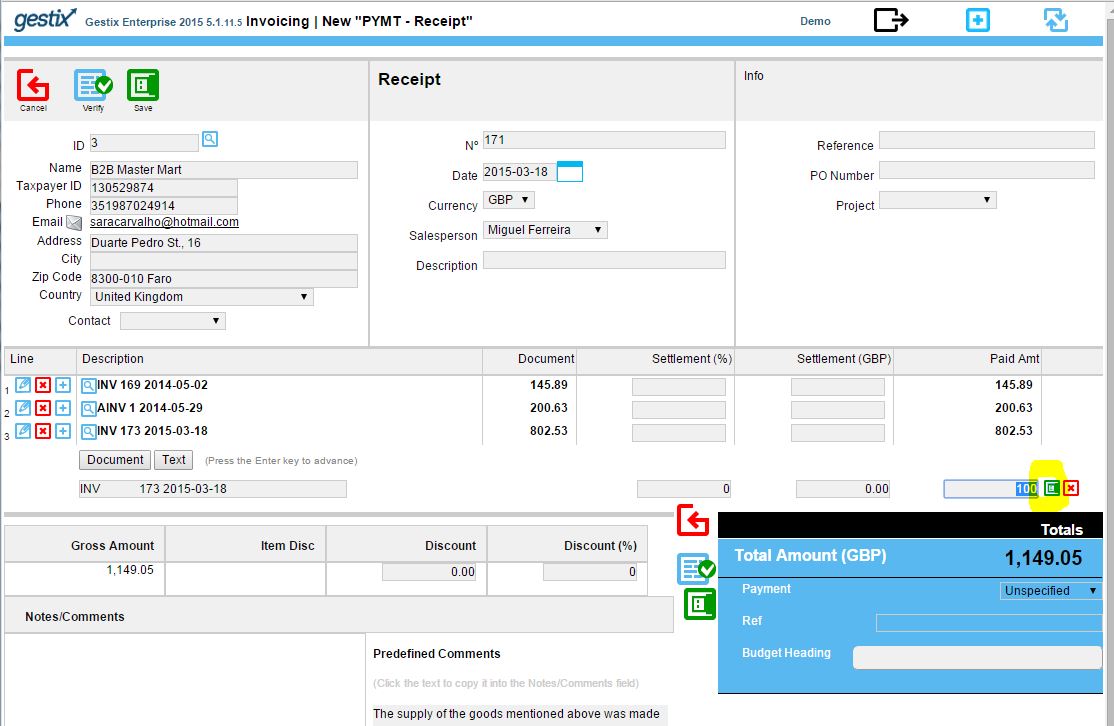
Open the Invoicing menu and click Receipt, New.
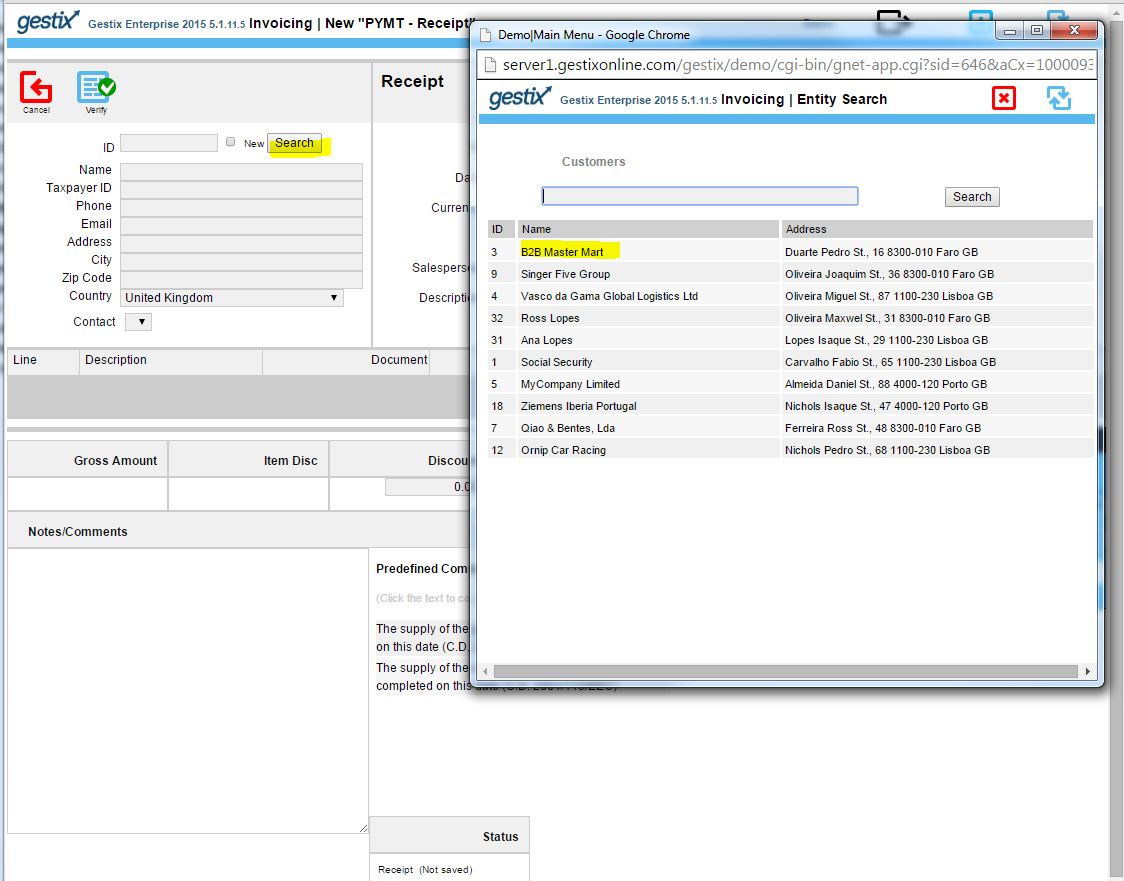
Here we’re clicking the Search button to choose the customer from a pop-up list.
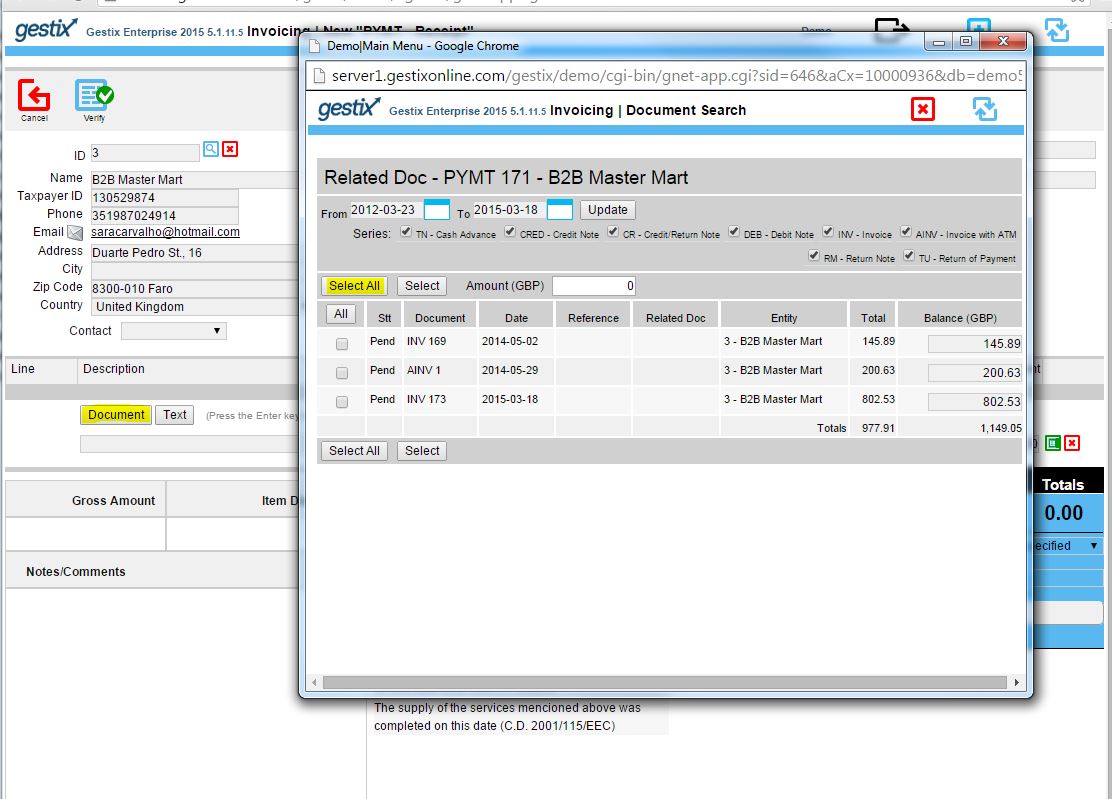
Then we click the button labeled Document to select the invoices being paid, then we click over Select All to add those invoices to the receipt.
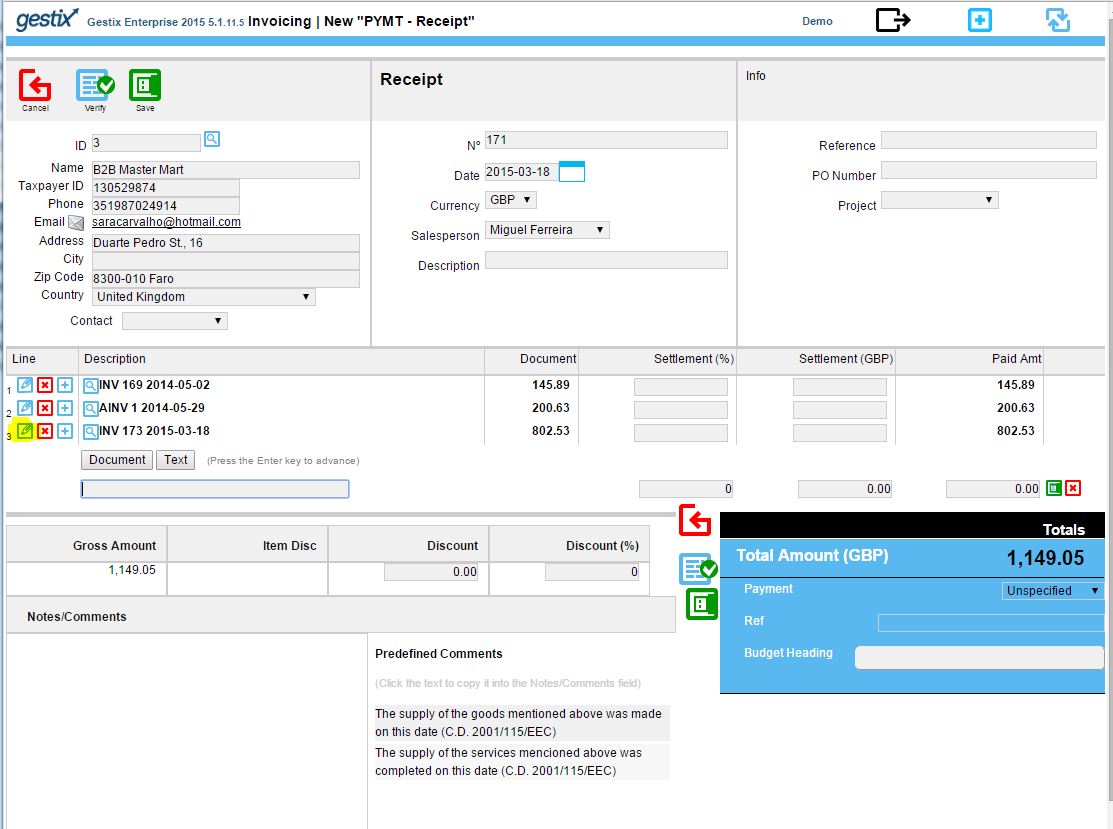
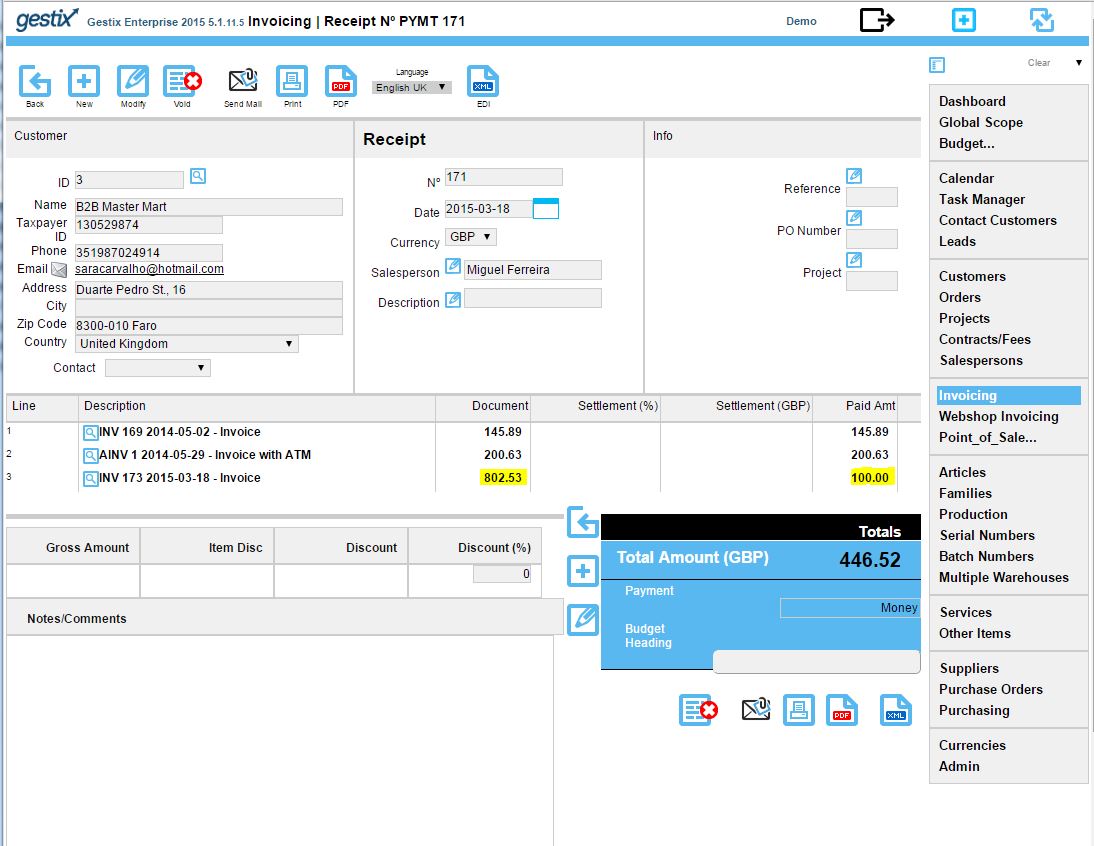
Since the customer is paying the amount of GBP 446,52 and the selected invoices total is greater than this, we want to edit the amount paid for, say, the last of the three invoices. Click the little pencil button labeled Edit at the left hand side of the line.
Now let’s enter the correct amount and click the little button labeled Save next to the Paid Amt field.
Click the Save button at the top of the document, and it’s ready to print or send by email.
For more information please check the Gestix website at http://gestix.com
Symptom: Gestix is working before the computer is shut down however. Once the computer is restarted, Gestix stops with the following message.
Gestix complains about the database system
(It seems there is a problem with the database server. If the program was just working and you don’t know why this is happening, try reloading the page in a couple minutes. If the problem persists ask your system’s administrator attention to the problem.)
Although the MySQL Startup item seems to no longer work on OS-X 10.10, it’s possible to start it from the command line.
1. Open Finder | Applications | Utilities | Terminal
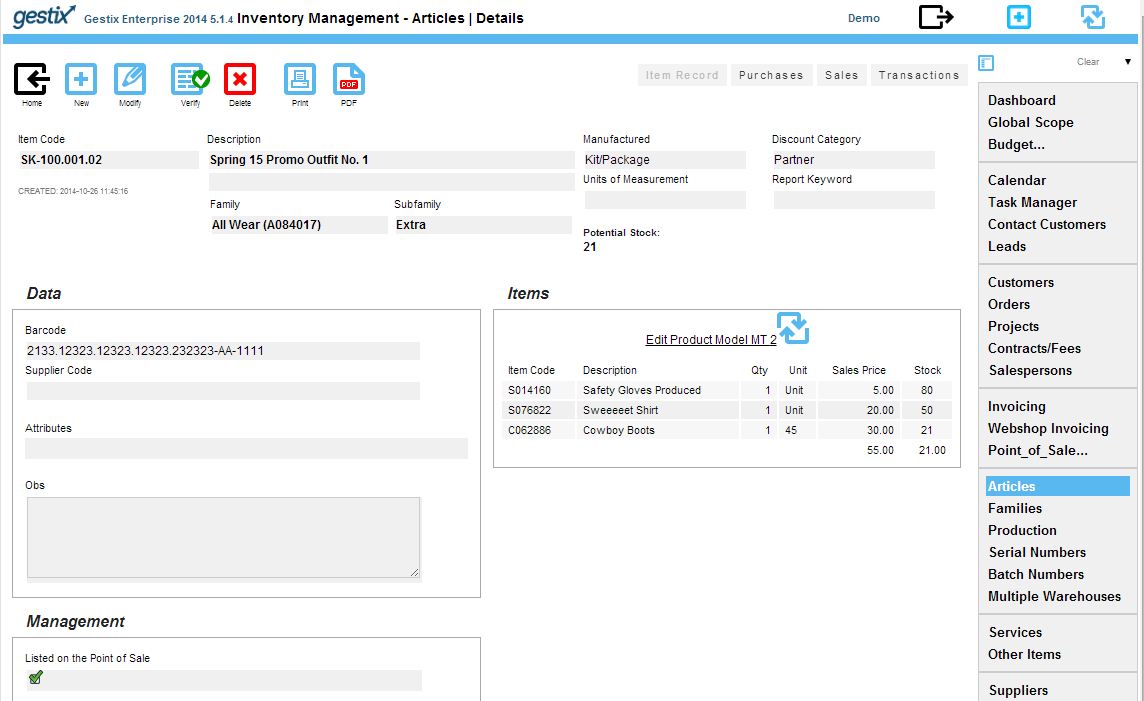
In some situations it can be handy to sell a set of items as an assembly instead of as discrete items. For example, a set including one table and six chairs would be defined as a unique product, having two items as its components: 1 x table and 6 x chair. In Gestix this is accomplished by defining the article type as a Kit/Package.
The price of the Kit/Package will be the sum of the components prices times their quantities. That prices can be predefined or left blank to make them being calculated at the order level and eventually select each item’s price from price list preferences for the involved customer or vendor.
Advantages compared to articles type Manufactured as Product:
Save operator time, inserting the kit/package into an order is similar to entering each and all of the components
Enable items to be sold both individually and as components of one or more aggregating items
Enable components to follow special price rules when used as part of a special product.
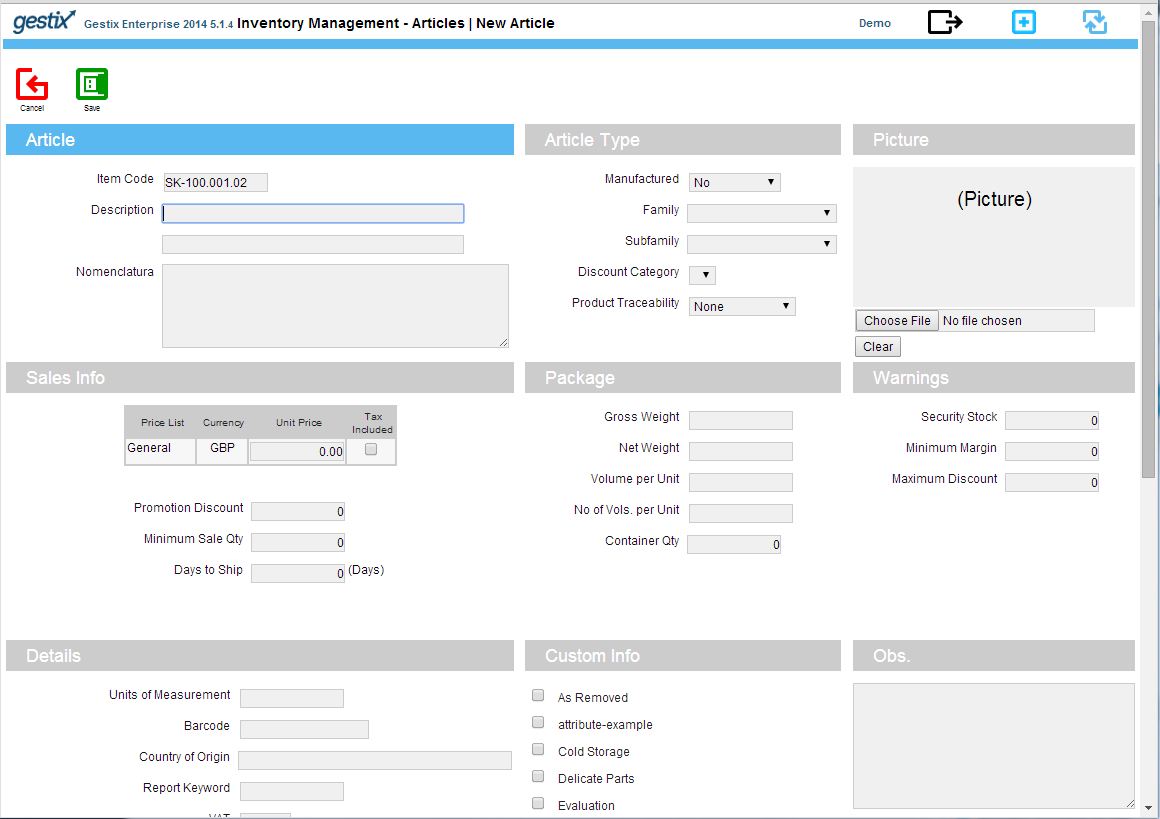
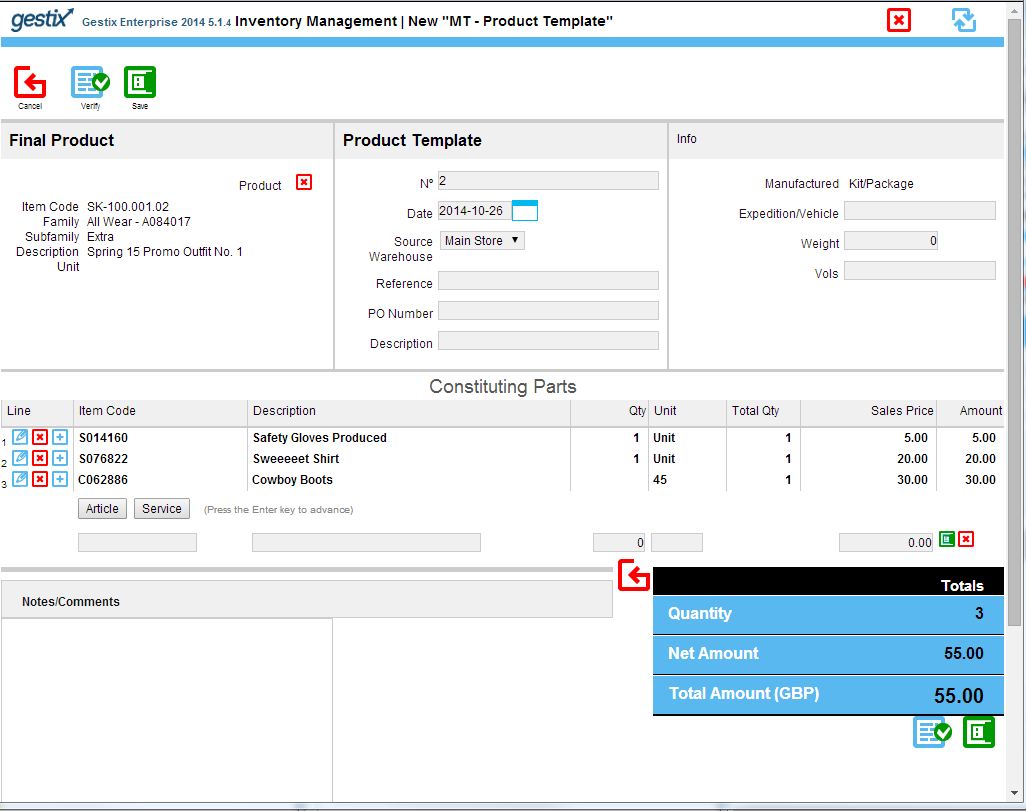
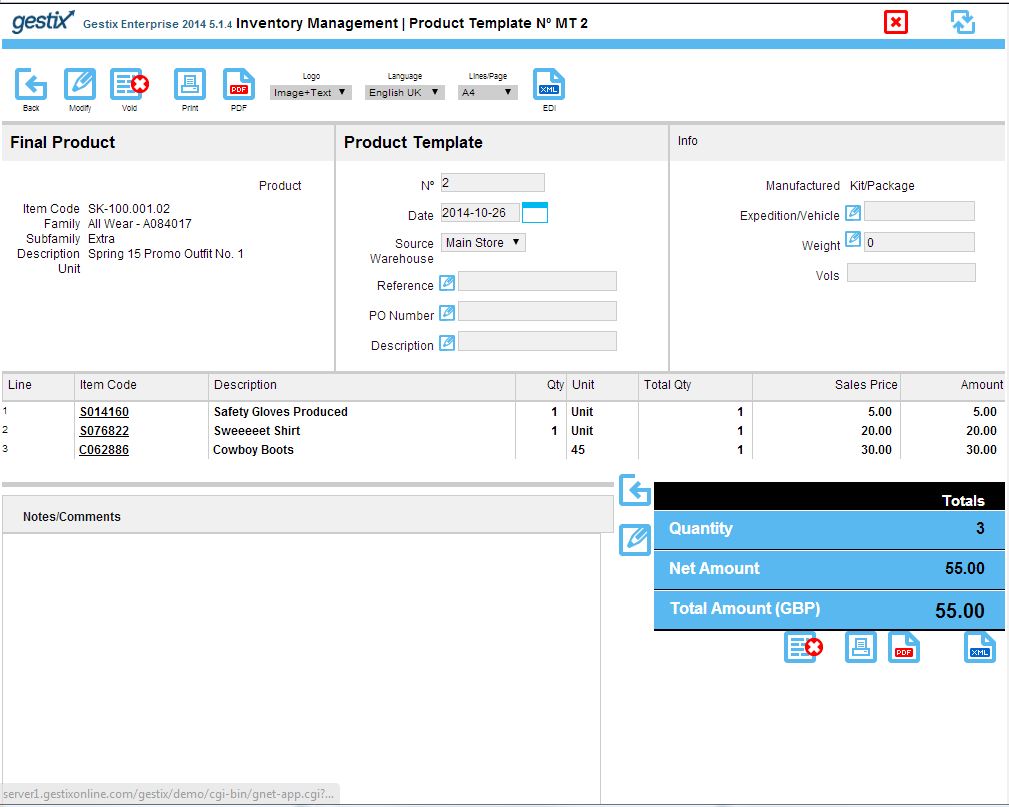
To add a new item as a kit/package proceed as follows.
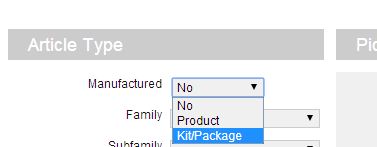
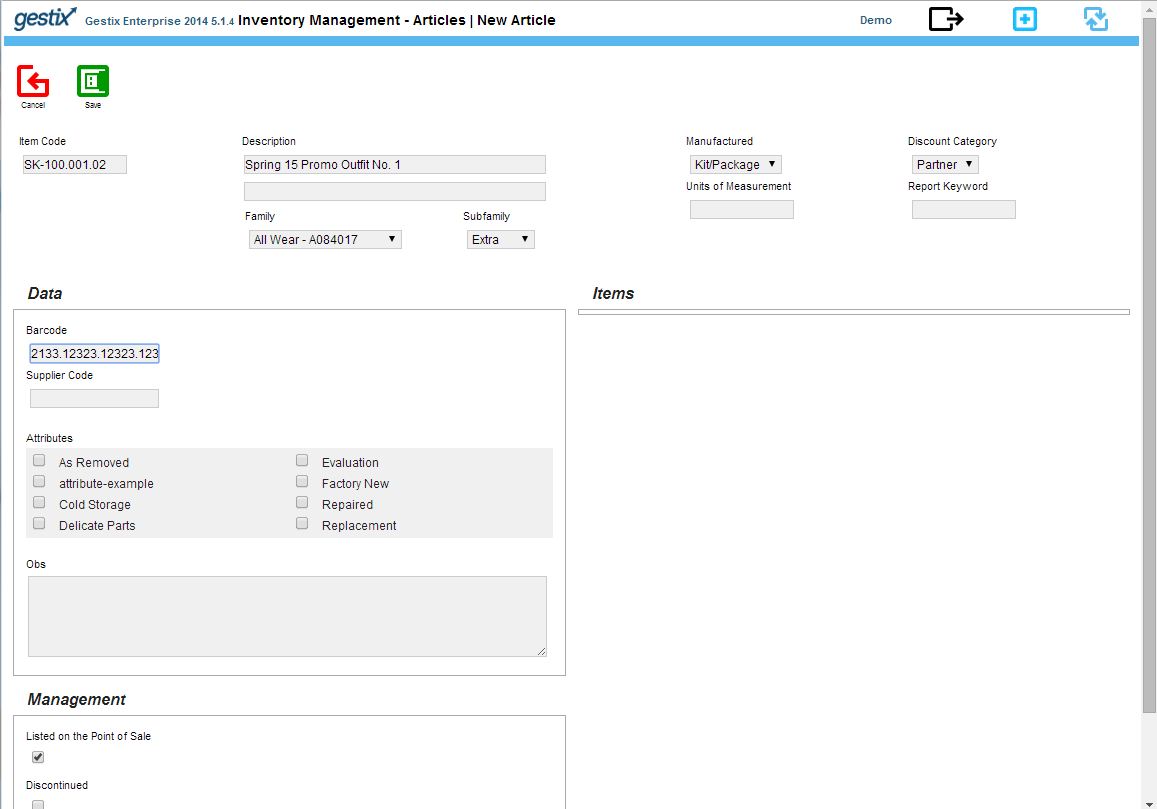
Open the Articles menu, tap New Article.
Set Manufactured as Kit/Package.
Enter description, and optional bar codes, prices and other relevant info.
Press Save.
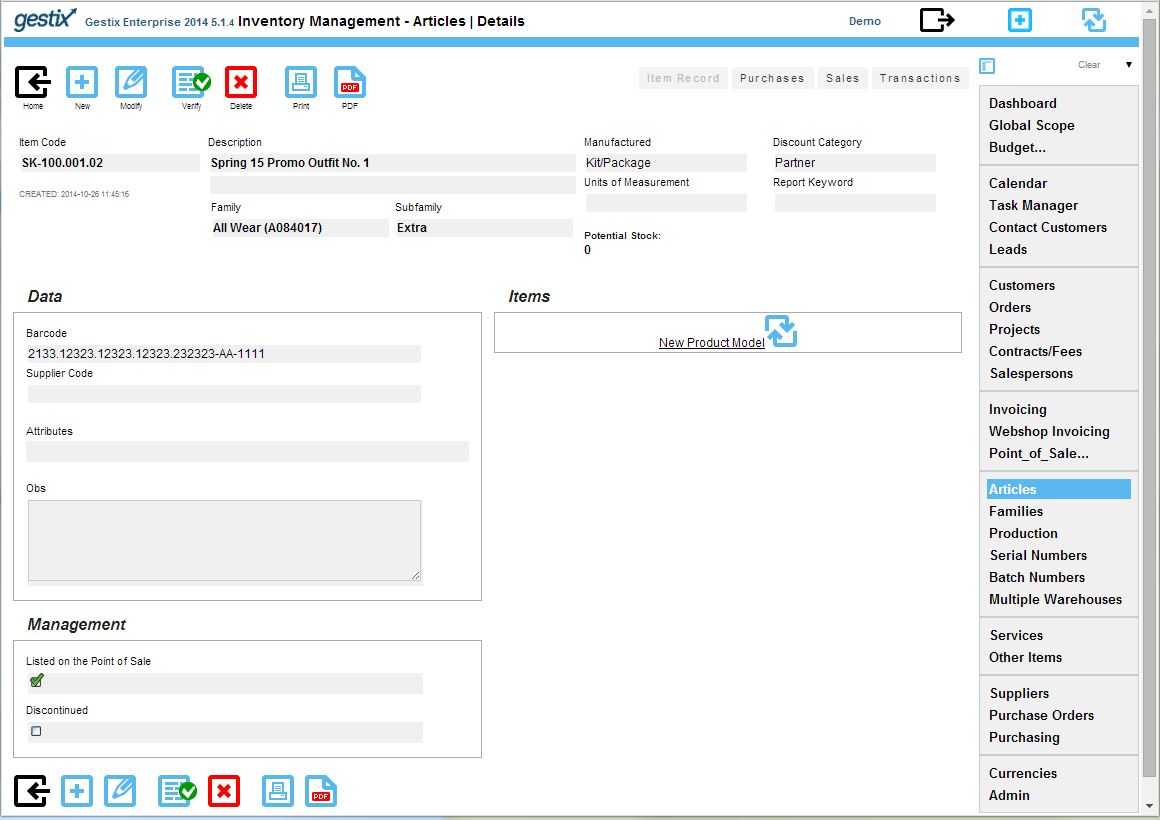
Notice the link New Product Model – tap it to edit the item list. Open it and add the items to be included.
(In Gestix version 5.1.4 a small issue prevents the software from displaying the correct items list. Instead of using the Articles button, enter the exact item code to include the components from stock. This problem will be fixed in the next release of the software.)
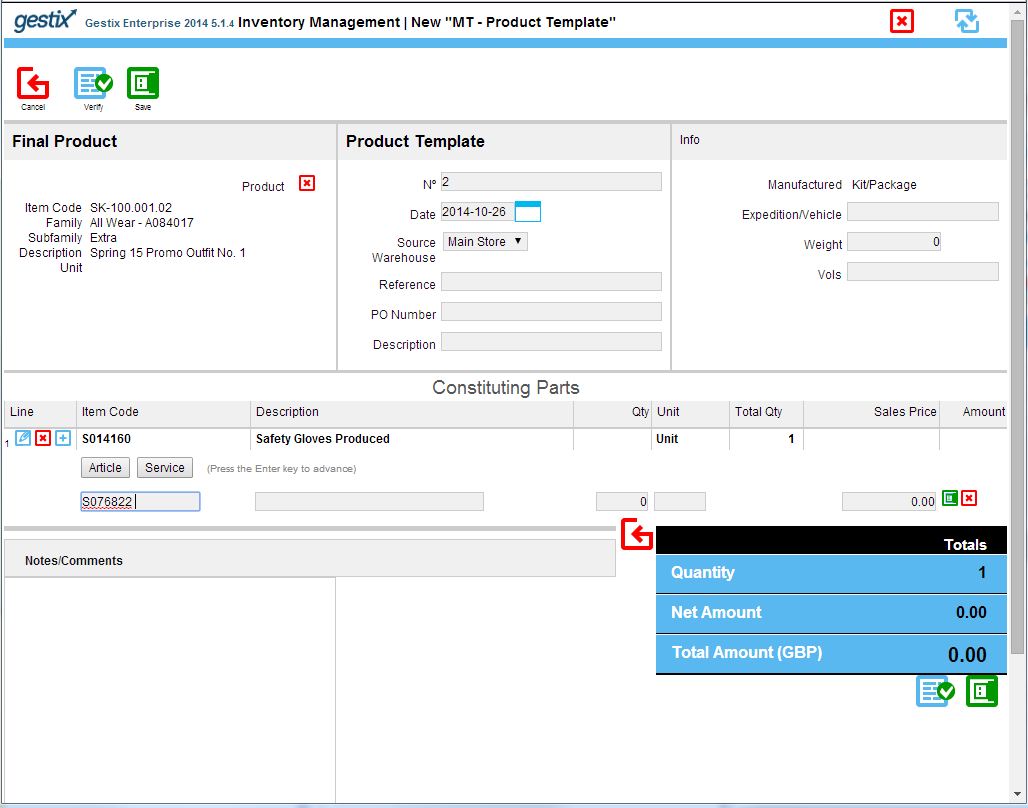
Unit prices can be defined in template or later on entering orders. Add each one of the components, editing unit prices or leaving them blank (zero) to assume order level pricing.
In this case the product model defines the prices to be used in this assembly.
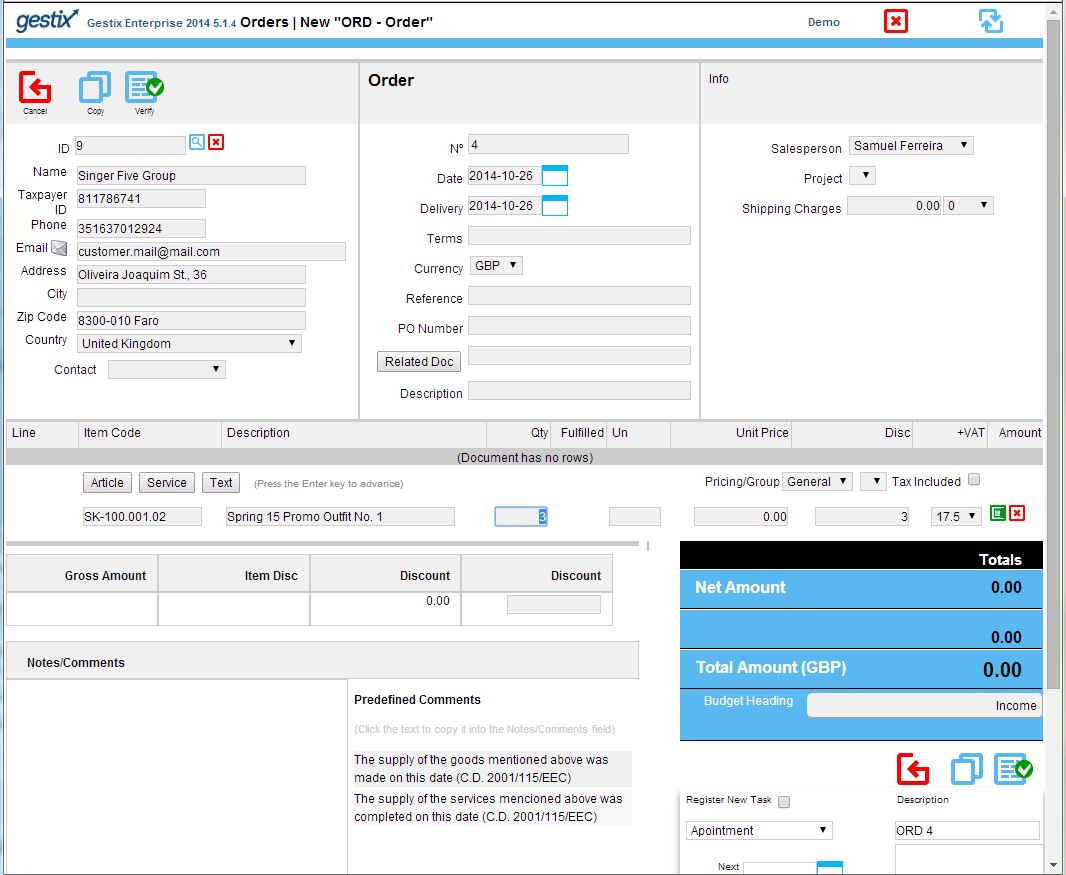
Now, using this assembly item on a new order.
Select our article from the list, and say we selling 3 sets, so enter 3 in the quantity field instead of 1.
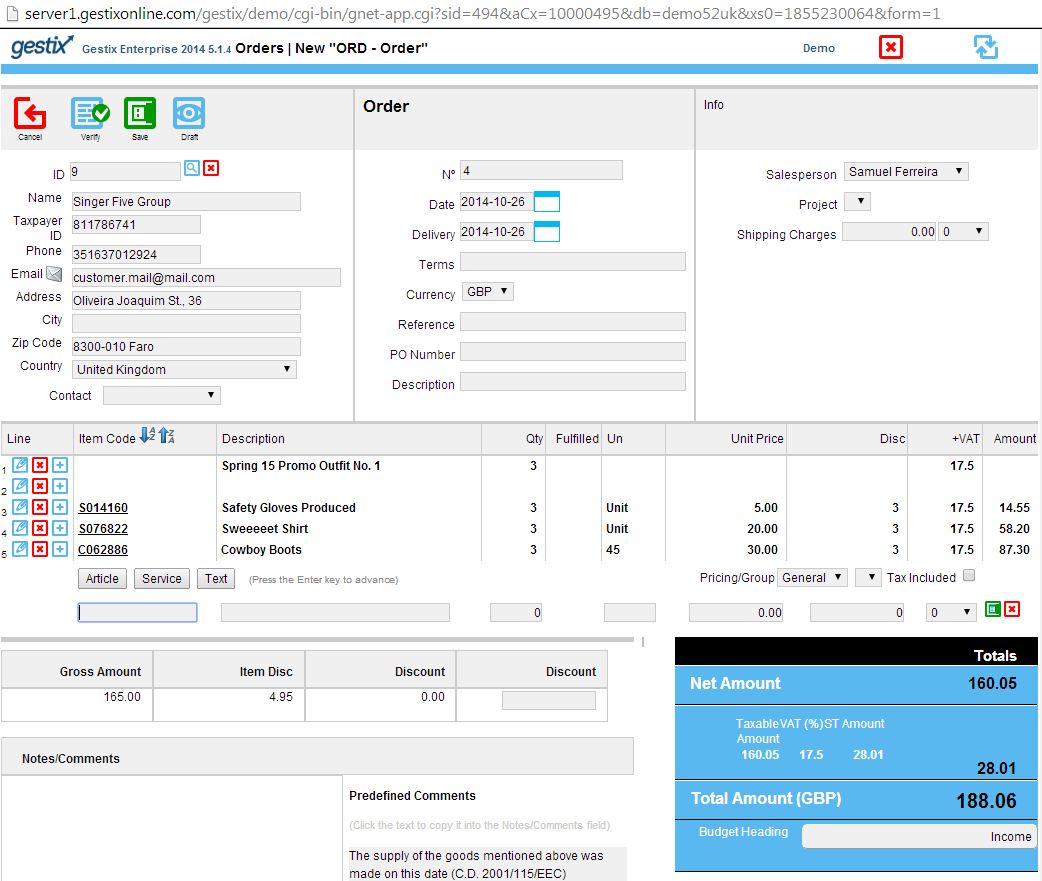
Notice that the component quantities were multiplied by three because we said we were selling 3 sets.
In version 5.1.4, if the user edits lines of the components just after adding them to the order, they can get later be displayed in a different order. To circumvent this issue, save the order as Draft and then Modify it before editing lines involving the Kit/Package components. A fix will be released soon.
If you are using Gestix Cloud or Gestix SaaS, over the Internet, then you just have to contact the technical support by email and make your request (http://gestix.com/go/contact)
Recover password on a Gestix Download installation.
Since the software is installed on your computer, the recovery has to be performed from the operating system command line.
Open Finder / Applications / Terminal and issue the following command:
/usr/local/mysql/bin/mysql -u gestix gnet_db --execute="Insert into sys_users (usr_name,usr_code,usr_pw,usr_disabled,usr_priv) VALUES ('temporario','temporario','[ana[',0,1);"
Then enter in Gestix using the following information:
Login: temporario
Password: civic
Then you should go to the Admin | Users menu and change your password. Delete the temporario user account when done.