Product traceability by Batch Number or by Serial Number

Serial Numbers are used for individual product. Batch numbers are used for lots of a product sharing some properties like production and “best before” date.

b Enterprise enables you to choose which products to handle Batch/Lot numbers and which products to handle serial numbers like smartphones, computers, and automobile parts.

Avoid losses due to produce validity and warranties issues, while meeting common standards and best practices in produce traceability.

Gestix offers two methods for tracking products:

Serial Number Tracking

Each unit in stock is assigned a unique id along with other information related to that particular unit or piece (see here an example of application in aircraft parts trading).

Batch Number Tracking

A unique id file is assigned to a particular quantity of product, along with other information relating to that batch of product, including product date and expiration date.

To enable one of the methods, edit the Product Traceability field in the article record, and choose Batch Number.

batch-number-tracking-in-gestix

Enter purchases, manufacture orders, and stock receipts with batch numbers being assigned by the operator or generated by the application.

entering2-batch-of-purchased-products-in-gestix

On sales, identify the batch of each tracked product by selecting it from the drop list.

invoice-with-serial-numbers-in-gestix

The final bill shows the relevant information for each item including batch id and dates.

sales-with-batch-numbers


Comunicação de Guia de Remessa ou Transporte por Webservice

Guia de Transporte – comunicar instantaneamente uma guia à AT por Webservice

O Gestix ERP oferece a possibilidade de comunicar os documentos de transporte por Webservice. Ao fazer um documento válido para transporte (Guia de Remessa, ou Guia de Transporte) fica disponível o botão Webservice na barra de ferramentas do documento.

Validação de Guia de Transporte por Webservice

Para o documento poder ser comunicado à AT deve  dispor de informação de Viatura e Data/Hora de Carga.

Se ainda não definiu o Utilizador e Password no site das Finanças e colocou estes dados na configuração do Gestix (menu Admin / Credenciais AT) veja nos passos seguintes como proceder a essa configuração inicial.

Criar utilizador no site da autoridade tributaria e configuração no Gestix

Aceda ao site da AT em https://www.portaldasfinancas.gov.pt/pt/home.action;
Faça login com os seus dados habituais e depois no painel centrar escolha a opção “Os seus Serviços

documentos_utilizador_AT_1

Na lista de opções que aparecem, escolha a opção “Outros Serviços”

documentos_utilizador_AT_2

Na lista de opções, escolha a opção “Gestão de Utilizadores”

documentos_utilizador_AT_3

Irá parar a uma listagem de utilizadores com autorização para aceder aos serviços da AT. Se ainda não tiver nenhum utilizador, escolha a opção “Criar um novo Utilizador”

Para documentos de Transporte, deve ativar a opção “WDT – Comunicação de dados de Documentos de Transporte”;

documentos_utilizador_AT_4

Guardar a informação sobre o número de utilizador, bem como a palavra passe que escolheu e inserir estes dados no seu Gestix em Admin | Credenciais AT.

inserir_user_ AT_gestix

Uma vez completada esta configuração, o seu Gestix fica pronto para comunicar instantaneamente os documentos de transporte à AT.

Comunicação Automática de Documentos de Transporte por Webservice

Ao concluir uma Guia de Remessa ou Guia de Transporte,  ao lado do botão Imprimir e PDF encontra o botão Webservice.

Clip2

Basta clicar neste botão para a guia ser comunicada e atualizada com o respetivo Código AT para efeitos de transporte.

codigo

Funcionalidade disponível em edições Gestix Business 2014 e posteriores.

Para mais informações visite gestix.com ou contacte-nos pelo telefone +351 919 844 655

Installing Gestix on a brand new Ubuntu LTS 14.04 (Trusty Tahr)

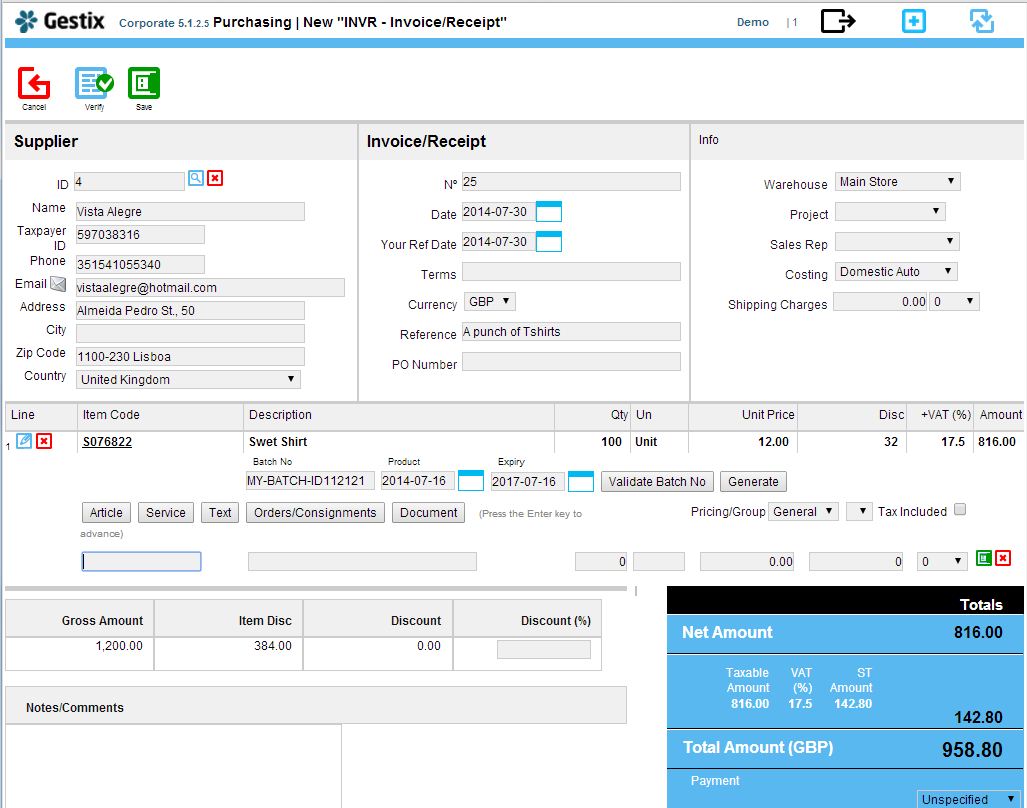
This article covers the installation of Gestix on a new server, Ubuntu LTS 14.04 in this case, without any software installed on it but the core operating system.

First we install the prerequisites, MySQL, Apache2, and Htmldoc. Gestix does not require PHP to be installed, yet PHP, as well as other languages, can be used to interact with the Gestix Corporate edition, to implement custom reports, collaboration portals, etc. In this example PHP is not required at all.

Let’s do it.

sudo apt-get install mysql-server
sudo apt-get install apache2

Add some modules to Apache, but not too many. Enable mod_cgi to permit the execution of the gestix binaries instead of downloading them. The Apache module mod_env is also enabled here, in order to support setting environment variables from the Apache options or configuration files.

Apache recommends using a2enmod to enable Apache modules by name, so we do:

sudo a2enmod cgi
sudo a2enmod env

Then, htmldoc, a open source solution for rendering the PDFs in Gestix.

sudo apt-get install htmldoc

In order for htmldoc to work properly with Gestix, some environment variables need to be set. We’ll do it using the Apache’s options:

SetEnv TMPDIR /tmp
SetEnv PATH_INFO /usr/share/htmldoc
SetEnv HTMLDOC_NOCGI 1

Install some stuff needed by Gestix

sudo apt-get install libssl0.9.8

sudo get-get install libmysqlclient.so.16.0.0

Finally, we install the Gestix tar ball  (file type tar.gz). Using the tar ball instead of the Debian package allows to install Gestix on the default web, by extracting in the selected spot. In this case, we’ll create a subnet http://localhost/gestix so we create this gestix folder in the web folder, and get the contents of the package copied there. It will create the gnet folder with all gestix’s stuff in there.

cd /var/www/html

sudo mkdir ./gestix

cd ./gestix

sudo tar xf ~/my_downloads/gestix_erp_web_amd64.tar.gz

sudo sh ./gnet/install.sh mysql_user mysql_pw database_name

It should be ready now. Open Gestix from the browser (replace 10.0.0.11 by your server’s IP):

http://10.0.0.11/gestix/gnet/cgi-bin/gestix.cgi

Is it working fine? Good. Otherwise, please post/comment about it here. We’ll help of course.

Protect your Gestix with daily database backups

In production servers it’s advisable to install AutoMySQLBackup:

apt-get install automysqlbackup

To backup all databases invoke automysqlbackup from the command line or add it through crontab -e:

# Edit this file to introduce tasks to be run by cron.
#
# Each task to run has to be defined through a single line
# indicating with different fields when the task will be run
# and what command to run for the task
#
# To define the time you can provide concrete values for
# minute (m), hour (h), day of month (dom), month (mon),
# and day of week (dow) or use '*' in these fields (for 'any').#
# Notice that tasks will be started based on the cron's system
# daemon's notion of time and timezones.
#
# Output of the crontab jobs (including errors) is sent through
# email to the user the crontab file belongs to (unless redirected).
#
# For example, you can run a backup of all your user accounts
# at 5 a.m every week with:
# 0 5 * * 1 tar -zcf /var/backups/home.tgz /home/
#
# For more information see the manual pages of crontab(5) and cron(8)
#
# m h dom mon dow command

55 3 * * * automysqlbackup /home/company/mysql_backup/

More about Gestix at Gestix.com.